Hello! Welcome to another Deck Spotlight! Today I will be reviewing my Skittershank’s Clawpack deck which I used to get second place in the Gasometer Tournament.
First, I will go over each objective and power card and then I will give a general overview of the deck, as well as it’s positive and negative matchups.
The decklist can be found here.
OBJECTIVES
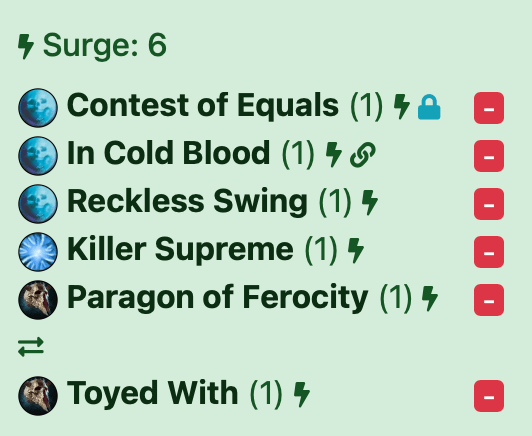
Contest of Equals – a staple card in my decks. However, it can be swapped for something else here since it is pretty difficult to achieve on attack dice since you have so many of them. It’s fairly simple on defense, though.
In Cold Blood – Since all of my fighters are either A) assassins or B) two wounds, this card is extremely easy to score on any kill.
Reckless Swing – The strategy to score this is Krowch’t. If you draw this in the first hand, don’t hesitate to charge him into the middle of enemies to attack someone and get free glory. This card is really easy to score overall.
Killer Supreme – While at first, only one fighter has Grievous, when you inspire, 3/5 fighters do, and one of them has 4 DICE. Keep in mind the attack has to hit to score this.
Paragon of Ferocity – Since all of my attacks are charges (almost), which gives me savage, it’s pretty simple to position my fighters to score this. Most of the time, I just go for the condition of being in enemy territory, but the leader condition is not bad either.
Toyed With – This is pretty simple to score, since you have a wide range of damage to choose from (Kinwhisper & Skulck 1 damage, Krowch’t and Padpaw 2, and Skittershank can do 3) Also, it’s kind of a consolation prize when your leader fails to roll a crit and use Grievous to kill someone leaving them on one wound.
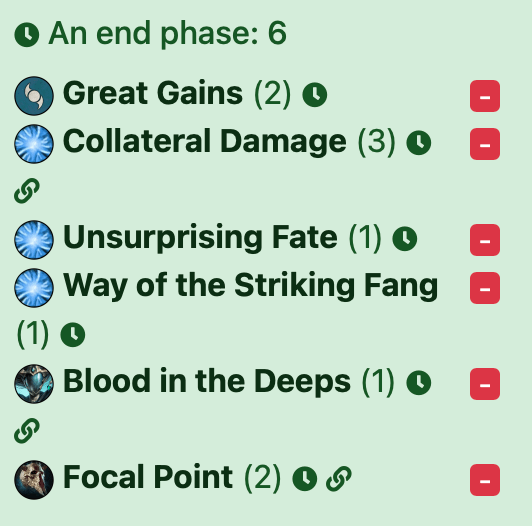
Great Gains – I didn’t want to take another 1 glory end phase, but I was debating between this and Shifting Walls, and Great Gains seems more reliable. Mostly because of…
Collateral Damage – THE Skittershank card. If you kill the leader, the card should be an auto score, as your fighters count toward these 4 fighters. It’s also 3 glory!
Unsurprising Fate – At first I was reluctant to take this card, but after experimenting with it it turned out to be really well! Charge a minion in and then have them die, and get one glory for an upgrade as well as Great Gains. It may seem bad at first but I like it!
Way of the Striking Fang – In case you haven’t noticed yet, the enemy leader NEEDS to die. For one glory, it may seem underwhelming. However, I couldn’t find another alternative as most were not as good. I like how you can score it while fully out of action.
Blood in the Deeps – Very reliable and easy to score (after the errata) as it’s not hard to be within one hex of a feature token, especially with Fearsome Fortress Drepur players suddenly appearing out of nowhere. The killing part is almost guaranteed, as you need to kill to make this deck work.
Focal Point – My leader usually charges into enemy territory to kill the enemy leader and ends up getting surrounded, so I thought that it would be cool to get rewarded for it. Then I realized this card existed, and for 2 glory it’s pretty simple. However, it does not get scored in no-one’s territory (one hex makes a big difference).
POWER CARDS
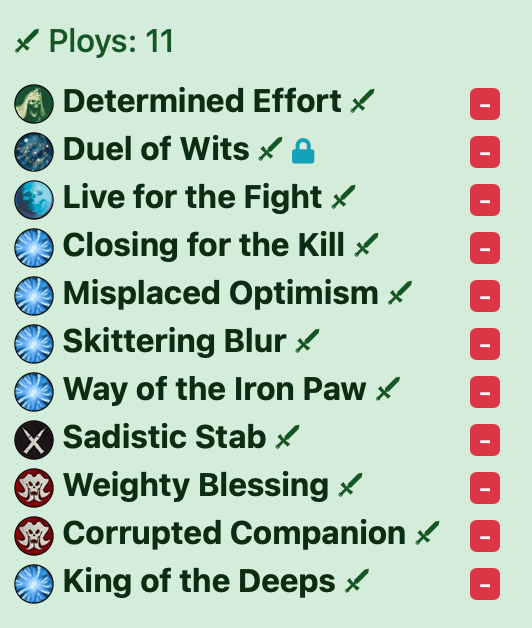
Determined Effort – The reason I didn’t take Skittershank to a lot of tournaments till now is cause I thought that the moment I did, my dice would start a revolution against me. After making this deck include almost EVERY SINGLE ONE of the +1/2 dice ploys in the game, I feel safer.
Duel of Wits – My power deck has 11 upgrades and ploys, so I need some draw tech to help draw it all (especially since I hate discarding cards for some reason). Duel of Wits is very reliable for this.
Live for the Fight – While none of my fighters are brawlers, I still get +1 dice! More accuracy!
Closing for the Kill – Either a double Sidestep, already great, but I can also potentially turn it into a single MEGA sidestep with Padpaw’s SMOKE BOMBS. Really useful card for Blood in the Deeps, Focal Point, and stabbing the enemy leader.
Misplaced Optimism – When the enemy thinks they are safe cause they deployed the leader 7 hexes away from you, prove them wrong with this card. Alternative uses include pushing leaders away from support, pushing leaders near you you to get support, pushing them to make them trapped, or breaking Illusion upgrades (Shadow Keeper, I will find your house).
Skittering Blur – My favorite card in the deck. Very powerful in any situation, but hilarious when your opponent goes for the 4 +1 dice ploys in one power step strategy. Keep in mind that Kinwhisper turns into an assassin when he inspires, so he gets the bonus as well!
Way of the Iron Paw – Slightly less funny, but still really good, especially against Mollog since your leader cannot one-shot him. Give Mollog the same feeling you have. Imagine a 4 damage fighter cannot kill a mouse.
Sadistic Stab – Speaking of Mollog, would you like to be able to 2-shot him with NO UPGRADES? Introducing Sadistic Stab! The 1 damage you take is overshadowed by your reward for killing the enemy: Collateral Damage, Way of the Striking Fang, inspiration! If playing against a warband with 3 wounds, I would recommend charging Krowch’t into the leader on the first activation and one-hitting them with this card. I don’t recommend using this on non-leaders, though.
Weighty Blessing – FREE CLEAVE ON ALL ATTACKS? I’LL TAKE IT! (p.s: please don’t, use the +1 Defense instead. It turns your leader into 3 dodge and when you add all the defensive upgrades in this deck he can become a 4 dodge with 2 reroll acrobat) Jokes aside, this is a really good defensive card. In a pinch you can maybe take the Cleave but 95% of the time defense is just better.
Corrupted Companion – Not 1, but +2 DICE? A really good accuracy card; the benefits outweigh the negatives by at least 500 kilograms. I would NOT recommend using this and Sadistic Stab at once on your leader. It makes him very prone to death (speaking from experience).
King of the Deeps – You can use this card to gain more dice against the leader. OR… you can save it and then give your leader Great Strength and one-shot some random 2-wound enemy. I would recommend using this against the enemy leader unless they died. Then go with option 2.

Great Fortitude – Your leader is a very formidable fighter, I prefer keeping him alive. +1 Wounds can be very clutch in most situations.
Great Strength – One of my least favorite cards in this deck. +1 damage at no downside at all is just too bad. I recommend swapping this card ASAP.
(in the unlikely event you could not tell, that was sarcasm)
Champion’s Fortitude – As I said before, your leader=powerful. This is technically a +1 defense, so it’s a really good defensive bonus, especially at the downside it has (none).
Gloryseeker – This is for putting down bulkier leaders. It allows your leader to one-shot 4 wound fighters with Grievous but the upgrade has no range restriction so can work well on Kinwhisper too.
Shademark – Since all your fighters are Dodge, this is literally Champion’s Fortitude 2.0 (or Copy_of_Champion’s Fortitude).
Eshin Throwing Stars – Honestly, I think I forgot to remove this from my previous deck when I was using Prehensile Tail. It’s not a very good card, but it does give you more range and combo-es well with Gloryseeker. That, or use it to Stagger someone.
Supernatural Agility – I don’t think I need to explain this one, but +1 defense at no downside to a warband full of 1-2 Dodge fighters is very good.
Marked by the Dark – Not one of the most famous cards, I use it for the Flying part. If an enemy uses a board with blocked hexes, lethal hexes, or just builds a wall of fighters to block you, you can now get through. The Ensnare part is nice, especially when fighting dodge (Drepur and Lady Harrow were the ones it worked best on).
Gifted Ferocity – You really thought I was done with +1 dice cards. Give this to your leader, and he will be consistently proc’ing Grievous! Remember, it can be given for free on a kill.
Deathmaster – Last accuracy card of the deck. You know how you always roll Double Supports when having 0 supports? Well, with this card turning those Double Supports into successes, those days are gone. The age of Single Support begins. And a +1 move is surprisingly a lot when your opponent is hiding at the end of their board.
Shadow Paw – For when you get longboarded, and the enemy leader hides like a coward at the very end of the board. Warning: This card has a nasty habit of appearing in your first hand when you don’t need it and being at the very end of your deck when you do. Also, BE CAREFUL when using this. You have to use it in your last activation to minimize the chance of you being killed while waiting to attack. The enemy can also run away if you while it isn’t your activation, or worse, push you away. High risk, very high reward card. If the enemy leader dies, you can use this card instead of moving when everyone has a charge token.
OVERVIEW
So, in this deck, you need to kill the enemy leader ASAP. After that, you hunt down the stragglers and kill them off. Keep your leader and/or Padpaw alive. They are your best fighters. People overhype and are scared Kinwhisper: you can use him as bait. Skulck can be used to charge the enemy leader to bring them into killing range for your leader thanks to his 3 Range. Krowch’t is used to score Reckless Swing and other reckless objectives, and he has a base 2 damage which is really nice so you can use him to significantly weaken the enemy leader.
As you can see, this deck has a medium glory ceiling, but you also bleed a lot of glory thanks to your aggressive play style (at least I do). The enemy leader should be dead by the end of round 2 for you to have a chance at scoring everything, so kill them ASAP. You shouldn’t miss attacks, thanks to the absurd amount of +1 dice.
Positive matchups, as in you will probably win playing against these, include:
– Warbands who REALLY need their leader alive, such as The Exiled Dead, Sepulchral Guard, and Spiteclaw’s Swarm.
-Surprisingly, Mollog. The warband mostly relies on their leader, and he has really low defense, so charge him over and over till he dies.
– Ylthari’s Guardians, Zarbag’s Gitz, The Starblood Stalkers, and Grinkrack’s Looncourt since the leader has 3 wounds.
Negative matchups, as in you will probably lose, include:
– The Wurmspat, since they have that weird and highly irritating ability to randomly tank damage. This matchup requires a lot more luck than others to kill Fecula.
– Hold Objective play, since it does not require being close to you and players just hide at the end of the board. Not as bad of a matchup if you don’t get longboarded or offset 4-ed.
Neutral matchups include all the rest, but some might be surprising. Examples include:
-Rippa’s Snarlfangs, when I kill the leader, they inspire! Isn’t that a negative matchup? Yes, but what does he gain? 2 inspired fighters as well as one glory from Burning Spite. And you? 5 inspired fighters, as well as 4 glory from Collateral Damage and Way of the Striking Fang! Just make sure Rippa gets one-shotted, or it won’t end well.
-Xandire’s Truthseekers have the same problem as Rippa, but they are probably easier to beat. Just watch out for the bow person to not accidentally kill all your minions in one turn.
-Hexbane’s Hunters do lose a lot of stuff when their leader dies, but they also gain STUPID amounts of stuff when someone dies. Namely Pure Carnage and Lives Well Spent, as well as a free upgrade or move/charge token being purged. This is pretty close to a positive matchup, though.
Overall, kill the leader, keep Padpaw/Skittershank alive, position to score objectives, and you should be good.
And that’s it! Thank you for reading, and I hope to see you soon!
I did this article in a slightly different format than my other Deck Spotlight article, if you have a minute, I would be happy to receive some feedback if you read them both. Which one did you like more?
Once again, thank you, and I hope to see you again soon!
