Hello! I haven’t posted in a while, but here is my latest deck spotlight showing my Crimson Court deck I took to a recent tournament (which I forgot to write about…)! It is about invading the enemy territory, and is mostly passive glory if you can do that.
As usual, I will first go over each objective card, then power card, and finally give a general overview of the deck.
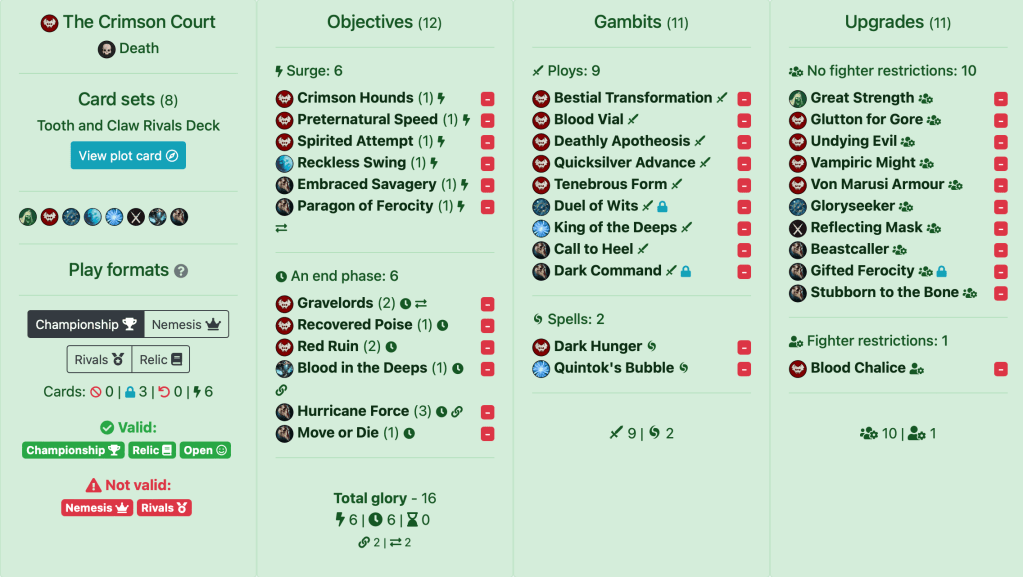
Here is the decklist:
OBJECTIVES
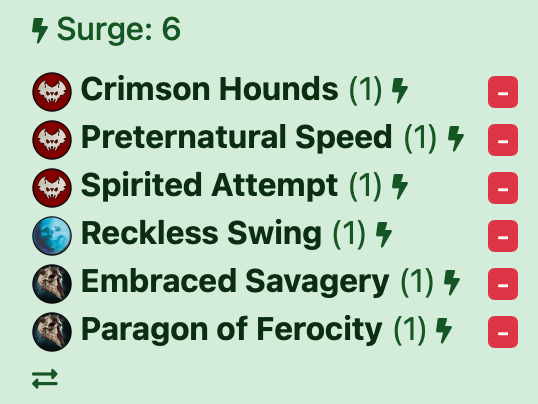
Crimson Hounds – I get a Glory for attacking someone while another friendly fighter is adjacent to the target. It’s really reliable, as my fighters are pretty bulky with 4 wounds each so I will rarely have a case where there aren’t enough fighters to score this. Plus, all my fighters need to be around the same place so it’s easy to get them next to one guy.
Preternatural Speed – All be in my opponent’s territory. As long as you don’t get longboarded or offset four-ed, this is a really easy objective. The vampires have 4 move each and Ennias can get 6 move when Bloodthirsty. Additionally, this card has synergy with the rest of the deck.
Spirited Attempt – As previously stated, the vampires have 4 wounds each, so getting hit and surviving is really easy (as long as you don’t draw it as your last objective). This is basically almost-free glory!
Reckless Swing – The opposite of Crimson Hounds. I like both of them since you don’t need to hit to score the card, so they are reliable. In most cases, this is easier to achieve than Crimson Hounds, especially in the first activation, since you all start moving into the enemy territory while they still haven’t moved much, meaning they are likely to be grouped.
Embraced Savagery – All be savage, a classic card for 3-4 fighter warbands who aren’t Mari’s Purifiers. Since you need to get into enemy territory and then kill people (with charging), it’s really easy to score.
Paragon of Ferocity – Kill someone while savage and being in the opponent’s territory. The be in the opponent’s territory part is easy since you need to be there anyway, and the savage part is achieved by charging.
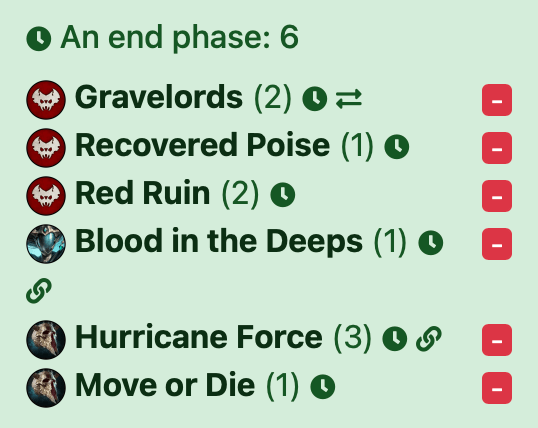
Gravelords – Have 2 inspired fighters or all fighters have 2 or more upgrades. At first this seems hard, but later in the game you will have a lot of chances to inspire and get glory for upgrades, so it gets much easier.
Recovered Poise – Have an inspired fighter. This is pretty easy, considering you can remove all your Hunger counters by killing someone while adjacent to them. The hard part is staying alive till the end of the phase to actually get inspired and score this, but usually it goes well.
Red Ruin – Kill 3 or more enemy fighters. This gets really hard against 3-4 fighter warbands, but the area I am in has a lot of swarm warbands so I can score this pretty well. Also, this helps keep my glory total higher, since without another 2 glory objective to replace this I would have only 15 glory total.
Blood in the Deeps – This is really easy after the errata. For easier scoring, make sure to put as much objectives in enemy territory as possible, since you need to be there anyways. This will help you stay near the feature tokens.
Hurricane Force – This might seem greedy, but I scored it pretty well. As long as you rush your opponent first and they start trying to kill your fighters, this is pretty easy. Just try not to mulligan with this in hand unless you have absolute garbage cards, since it gives your plans away.
Move or Die – Another really easy card, since I just need to move into enemy territory and that is usually achieved through moving and charging. Just make sure to get one on EVERYONE and not forget about 1-wound Ennias or someone else sitting in the back.
POWER CARDS

Bestial Transformation – Discard all your upgrades, then get Cleave and Ensnare. I like to use this in early game to put it on a fighter with no upgrades and then charge them in with much higher accuracy. However, it does get discard once the fighter gets an upgrade. It also has little to no use in the late game due to everyone being full of upgrades, most of which are better than Cleave+Ensnare (especially for Vellas Inspired, she has that built in).
Blood Vial – A way to remove Hunger counters and heal. In Rounds 1-2, while your still have a little bit of Hunger, this is free inspiration. In Round 3 you will need to combo this with something else to inspire. That, or just use it as a heal.
Deathly Apotheosis – If you are Bloodthirsty, the fighter you choose with this will heal whenever they are given a Hunger counter. If they are Inspired, they will gain a re-roll. Since Bloodthirst is really hard to achieve since Direchasm got rotated, I mainly use this for the re-roll. Never underestimate a re-roll, especially for attack dice.
Quicksilver Advance – Choose a friendly fighter and make a move action with them, or replace their charge tokens with move tokens. Since you need to be in enemy territory, this is really helpful, and I would recommend it over pushes like Sidestep, since you have 4 move but Sidestep only pushes you one hex. However, Sidestep doesn’t give you a move token so it is more efficient if you need to get close to someone.
Tenebrous Form – Turn someone into a ghost with 3 Dodge. This makes them much harder to hit especially if they are in a cover hex! I use this to charge someone in and them give them a lifespan higher than 1 turn.
Duel of Wits – Draw 2 cards when your opponent plays a ploy. Especially useful since you have a 22 card deck!
King of the Deeps – Gain +1 die, or +2 die on your next attack if you have more damage than your target’s wounds. This is a nice accuracy buff, and with all the +1 damage in this deck you can actually get the +2 die in some cases, making it better than other similar cards.
Call to Heel – Your second push in case you can’t all make it into enemy territory. This one can also be used to pull someone closer to you, push yourself closer to someone, and pull a friendly fighter four hexes. This makes it great, especially since this is an aggro deck and you will pretty much always be savage.
Dark Command – It’s hard to build a Tooth & Claw deck without this. In some cases it is better, like when playing against a beast warband (Exiled Dead especially). Other times you can use it as a backup in case you miss, or to deal 1 more damage than your opponent thought you could. Overall a really good card.
Dark Hunger – The one way to reliably generate a lot of Hunger counters. Since it also removes a Hunger from the caster, I would usually cast it with Duvalle onto Vellas or Ennias to give them Scything or +2 Move. Especially hilarious if Vellas gets it and you are playing a swarm warband (Exiled Dead, especially).
Quintok’s Bubble – Defensive tech. It also gives you flying which can come in clutch in some rare cases, but most of the time I use it for -1 damage from attacks that target you.

Great Strength – If you provide me with a reason not to I won’t include it. All my fighters are Range 1-2, so this works for every single fighter, and +1 damage is always great, especially at no downside!
Glutton for Gore – More ways to gain Bloodthirst before Round 3. It is useless in the third round, and only has use the first one, but that is one of the only remaining ways to get Bloodthirst which can be very useful.
Undying Evil – A get-out-of-dying card, but only if you roll a shield. This has a 33% chance of happening when playing casually and 0% chance when playing competitively. It can save a key fighter and block a 4 damage one-shot, but still only has a chance of going off.
Vampiric Might – +1 Damage while inspired, Grievous 2 while Bloodthirst is a great card! Most of the time you will be inspired, in which case it’s Great Strength, but if you give this to Ennias Bloodthirst, who rolls 3 dice, it has a pretty high chance of rolling that crit for the satisfying 4 damage!
Von Marusi Armor – This gives you -1 damage from attacks that target you while inspired, which is always nice, and while Bloodthirsty, you don’t take damage if it is exactly one. The funniest part is how it stacks with Quintok’s Bubble, so you won’t take damage if it is 2 or less if you happen to get that! A really nice defensive card in general.
Gloryseeker – More +1 damage, but only if you hit someone with 4+ wounds. If they have 3 wounds, you also have Great Strength and Vampiric Might to help with that, so this card is sometimes useless. In cases where it is useful, though, it is really good!
Reflecting Mask – I use this to make people less likely to attack me, since I don’t like having dead fighters. Most of the time, the risk of taking 2 damage is enough for some people to not attack you. Against 2 wound warbands, this card is REALLY nice. Otherwise it’s more of an eye for an eye card.
Beastcaller – Supports all your savage fighters, plus, whenever a savage fighter is pushed, you can push them toward you. The support is already nice since, most of the time, the fighters who need support will be the ones who have charged, but the push is also really funny, especially against people attempting to charge onto an objective to hold it. Overall, a defensive card for you and a disruption card for your opponent.
Gifted Ferocity – +1 Dice to Range 1 attacks, and it can be given for free! This is a really nice accuracy buff, but remember that Gorath does not actually have a Range 1 attack so this won’t affect him. Other fighters will really like this one, though.
Stubborn to the Bone – A re-roll if you are savage, plus you cannot be pushed. The push part is good since you need to stay in enemy territory, and there will always be that one Quiet Pock who no-scopes you from the other end with his Knockback 2 crossbow and flings you to Mars. The re-roll is also really good, especially on Duvalle Inspired, but it only works while they are savage (which is when they need it most anyway). An alternative for this can be Champion’s Fortitude if you don’t like being savage!
Blood Chalice – +1 Wizard level and a free inspiration (at the end of the action phase) for Gorath and Duvalle! I really like it on Gorath, since his Vile Transference action can be really annoying for your opponent, and this just makes it more likely to go off, but it can be put on anyone to inspire them faster.
OVERVIEW
This deck requires you to get into enemy territory, inspire by eating everyone taking them out of action while next to them, and then staying alive. I would recommend it to people who like fast aggro, or people who don’t like having one fighter who is noticeably better than the others, e.g. Mollog from Mollog’s Mob and Slythael from the Shadeborne, as that requires you to put all upgrades on them. The Crimson Court are very flexbile since all fighters can be given the same amount of upgrades to be strong!
A key card in your deck is Hurricane Force, it is your highest scoring card and without it your glory total is 13. You need to make sure your opponent DOES NOT enter your territory, even if you don’t have it in your hand, as scoring a surge might result in it appearing there! This deck has a medium glory ceiling, but you need to score Hurricane Force for it be stay that way. Luckily, your fighter’s don’t really bleed that much glory and the only way to be a Large fighter is to Bloodthirst Gorath.
A lot of your power cards try to make your fighters inspired or Bloodthirst, so use them! Check what your matchup is, and then inspire/Bloodthrist accordingly. For example, against swarm warbands, you need Vellas with Bloodthirst to gain scything and become a lawnmower (assuming you hit). However, against someone like Gorechosen of Dromm, you would need her inspired to gain Cleave and Ensnare. The last tip regarding power cards I will give is try to lose as much cards as possible in the round, and discard the rest. Since you have a 22 card power deck with only one draw card, this will help tremendously in getting through it!
Overall, your priorities in the game should be in this order:
-Getting into enemy territory
-Staying alive
-Inspiring (killing)
But check your objectives as well, and try to adapt each game to whatever you will need to do!
Positive matchups for this deck, as in games you will likely win against, include:
– Zarbag’s Gitz, as they have a lot of fighters so it is SUPER easy to inspire off them.
-Grinkrak’s Looncourt, for the same reason except this one is a bit harder since they tend to play Fearsome Fortress and don’t want you in your territory.
-The Grymwatch, as they have a lot of fighters with low wounds and defense, and you deny their inspiration condition!
-Sepulchral Guard, cause of their low wounds and defense, but please do not underestimate The Champion as he has a nasty habit of getting overpowered and team wiping.
Negative matchups, as in games you will likely lose, include:
– Counterpunch decks, for obvious reasons.
– Fearsome Fortress, since they typically don’t want you in their territory and will do their best to stop you being there.
-Storm of Celestus, the biggest example of the matchup above.
There are more, of course, but these are the most important ones.
Anyways, I hope you enjoyed reading this! If you have any feedback, you can contact me on Twitter or Discord (VintroV2#0001), and I hope to see you again soon!
