Hello! Michael here. Today I wanted to talk about an interesting topic and one I know we will all love – Grinkrak’s Looncourt!
In this article, I will give you a Grinkrak’s Looncourt guide. I will go over the strengths of each fighter as well as give you some ‘Dexamples’.
HOW THE JOURNEY BEGAN
First of all, I will go over how the Grinkrak Grind began for myself. I recently got interested in the stats project by Borni. I noticed a great injustice – so far, in the ‘Spreading Restrictions’ (otherwise known as ‘current’) meta, Grinkrak’s Looncourt had ZERO games played. Appalled at this unfairness, I picked up the warband and made it my mission to make them seem OP by constantly winning games with these lunatics. After about 15 (or more) games, I feel qualified to give a decent guide on the loonknights!
THE FIGHTERS
First of all, all friendly fighters are ‘Loonknights’ except Grinkrak, which is important for the warscroll. Ironically, one of the Looncourt’s biggest strengths is their mighty stats. The main issue? Their ‘mighty stats’ are all spread out throughout different fighters.
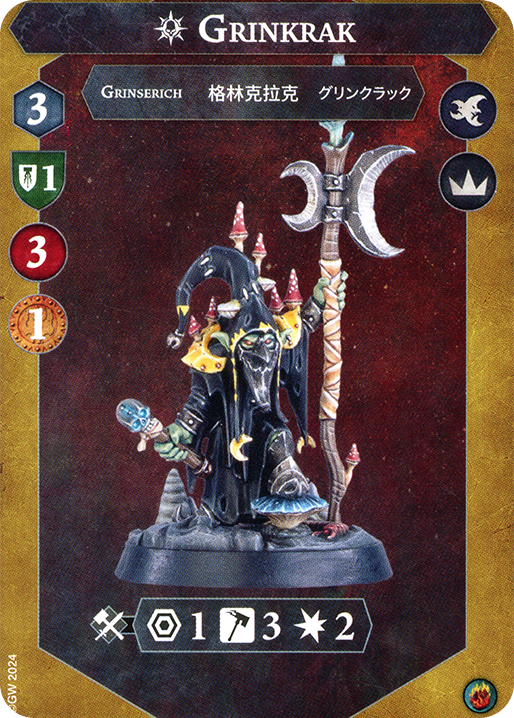
- Grinkrak (inspired) has an attack that rivals most Stormcasts, but is slow.
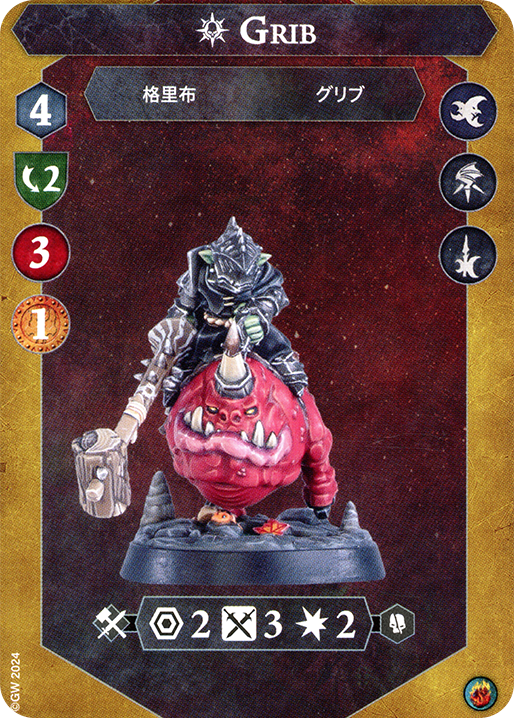
- Grib has 3 damage base at Range 2 and with decent accuracy (inspired)! He is by far the best fighter excelling in speed, tankiness, and attack.
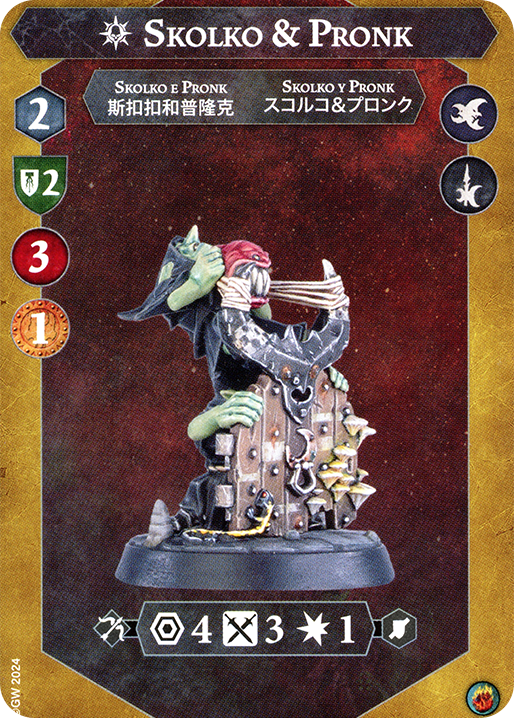
- Skolko and Pronk have Range 4 and Cleave, making them good far range pingers, while also being very tanky, but are super slow and don’t have any access to two damage.
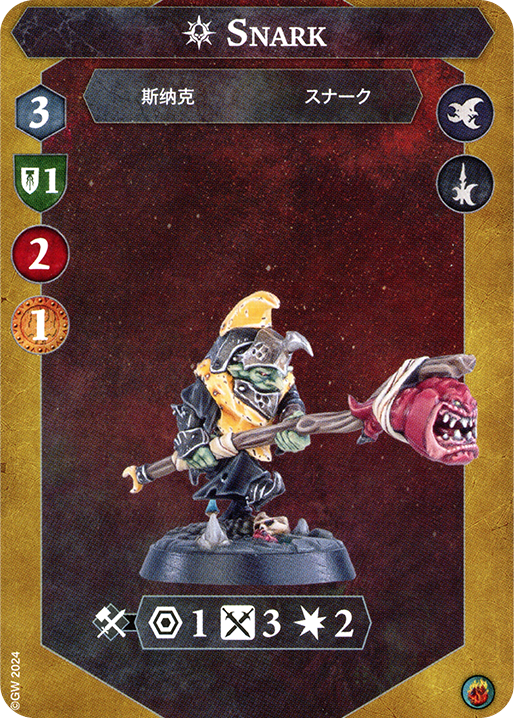

- Snark is just a decent fighter all around, especially attack wise, but lacks in defense and move.
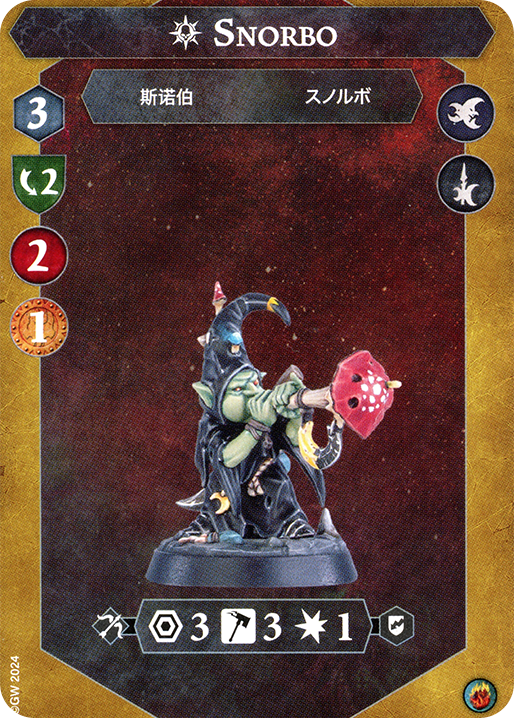
- Snorbo is like Skolko and Pronk, but he is more accurate while being slightly less tanky and faster. His main weakness is his uninspired squishiness and no access to two damage.
- Pointy Burk and Moonface Nagz are superb weapon caddies (or dub targets!) due to their 2 SHIELDS inspired (I have no clue why). Their main attack lacks in power though, but at least it benefits from dubbing. They also happen to be exactly identical stats-wise but Burk is better than Nagz for no reason in particular.
Now is the moment where I realize I forgot to explain the warscroll!
THE WARSCROLL
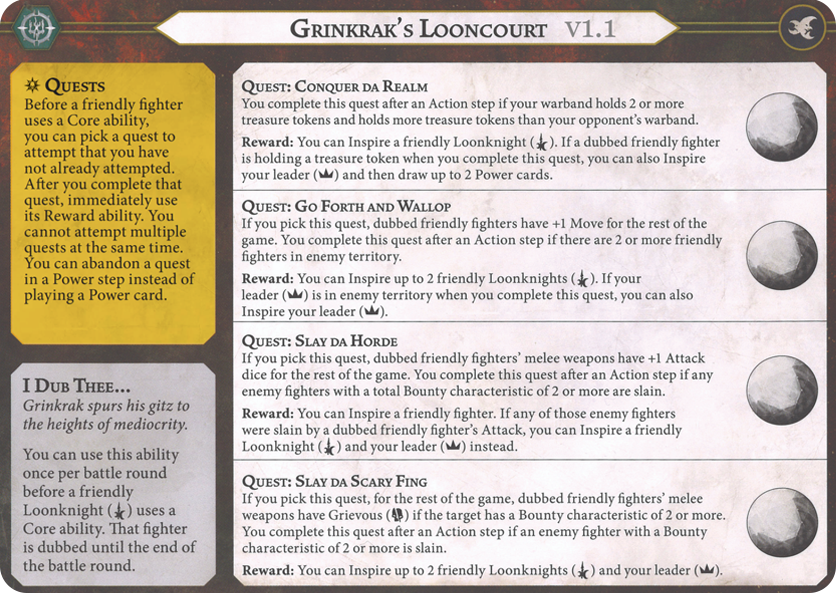
Here we have the mighty lunatical warscroll. At first glance, it looks just like any other. On second glance, you notice they actually have one warscroll ability you really can use to turn tides (maybe two).
To inspire, the gitz need to complete quests, which are your four abilites. You can have one quest active at any time, and you can accept a quest before you activate. You can also abandon quests to accept new ones, in place of playing a card, but once you do, you cannot accept it again.
Now for the most important part of the scroll – the Dubbing. Once per round, before you activate a Loonknight (so anyone but Grinkrak), you can ‘dub’ them for the rest of the round. While a fighter is dubbed, they get bonuses depending on what quest has been accepted, but more on that later.
Now for the quests. You have 4 quests, but in reality it can be seen as 3. One quest focuses on holding, one on invading, and two on killing.
- The first quest, Conquer da Realm, doesn’t give anything upon accepting it. You complete after an action step if you hold two tokens, and if your opponent holds less tokens than you. Once you complete this quest, your reward is that you get to inspire a Loonknight. However, if one of your two holders was your Dubbed fighter, you get a bonus – you get to inspire Grinkrak (specifically) as well as draw two power cards.
- This is by far the strongest ‘bonus’ reward and I always go for it. Two power cards is pretty significant!
- The next quest is Go Forth and Wallop. Notably, you get a bonus once you ACCEPT this quest, and that is +1 Move to your Dubbed frinedly fighters for the REST OF THE GAME! To score it, you need to have two friendly fighters in enemy territory after an action step, which is pretty easy. Your reward is you get to inspire TWO Loonknights, and the bonus reward is achieved if you leader is one of the guys in enemy territory, in which case he also inspires.
- This is the quest you want to make sure to go for each game. It forces slightly aggresive play, but the fact that two of your guys go to their inspired sides is huge. I also like to leverage the +1 for Dubbed guys, as going to 4 move on most guys is huge.
- The next quest, Slay Da Horde, gives the best bonus upon being accepted – +1 Dice to all of your Dubbed fighters permanently (albeit only to your melee attacks). To complete the quest, you must have two bounty worth of enemies dead. This can be any combination of 1+1, or just a 2+ bounty fighter dead. The reward for doing so is you can inspire one singular Loonknight. However, if one of the fighters who was slain for this quest was killed by a Dubbed fighter, you can also inspire your boss!
- This quest is one of the easiest to complete in the current meta but its reward isn’t too good. What it does give that is massive is the +1 Dice to dubbed attacks. This used properly can give you a whole round of someone like Grib swinging on 4 swords. The dice buff also applies to upgrades, so you can swing with a cheeky 3 Hammer Desperate Rage to catch someone off guard!
- The last quest is the hardest. Ok paper, it seems similar to the Slay da Horde quest. Once you accept this quest, you get Grievous on your dubbed attacks, but only on melee and notably only if the target is worth two or more bounty. The reward for this quest is a juicy double inspiration of your Loonknights, as well as your boss.
- Notably both this quest and Slay da Horde are scored after an action step in which the condition is met, allowing you to score both off of one kill over two turns. This quest has a huge reward but makes Grinkrak and Co super matchup dependent. Against a warband with weak two bounty fighters like the new Kamandora’s Blades, the extra grievous and easy TRIPLE inspire is huge. However, some games you just straight up won’t have access to the bonus nor the reward, especially into the current meta of Gitz and Grymwatch.
Now that we have the scroll and the fighters, we can talk some general strategies.
GENERAL STRATEGY
First of all, I would like to go over each fighters main strengths and how I leverage them to win games maybe sometimes.
Grinkrak is your accurate fighter. He goes down, and so does your chance to hit by a pretty serious amount. Accuracy upgrades are typically reserved for other fighters unless you REALLY need to hit that one attack. In an aggro deck, you must use Grinkrak to hit your one crucial attack each game, as he has the best odds, but keep in mind he is a prime target so your crucial attack better happen in R1 or R2. I like to deploy him near the middle of the board, as early on he is actually quite difficult to kill, especially if your opponent has no base three damage. If they do, deploy further back.

Next, Grib. He is by far your best fighter sporting good defense, damage, range, mobility, and to an extent, accuracy. In an aggro/kill stuff deck, it is very important to not charge with him until he is inspired or you REALLY need his three damage. In a more token focused gameplan (hereafter ‘passive’), Grib is used to be a nuisance whilst taking tokens making him more important in this play style than in aggro even. This is because he is the only one who can do meaningful damage without upgrades while also standing on a token due to his Range 2. Grib is almost always your first inspire.
Now time for Skolko and Pronk. Their strengths are their two shields, three health, and Range 4 with Cleave, but they lack any form of mobility and notably cannot benefit from the extra dice or damage when dubbed without an upgrade. This makes them a very good early game piece, my favorite use for them is to get out early damage while taking a token making for Conquer da Realm. Try not to lose them before inspiring, and inspired they become magnitudes harder to kill, even if they aren’t too threatening. Make sure to deploy them closer to the back in most matchups, and always near a token.
Now it’s time for Snark. Snark is a glass cannon, having the last two damage attack in the warband while also being two health. His weakness is his lack of defense when inspired and just in general. This makes me enjoy him more as a late game piece, as he is usually the last two damage guy standing. Other fighters want to inspire first in a passive plan in order to prevent their deaths, while in aggro plans Snark is a good choice for an early inspire for his extra accuracy. He is also a prime dub target as it makes him very scary for one attack – which is usually all he gets. Overall, Snark fills a similar role to Grinkrak – a fire and forget missile. Contrary to Grinkrak, he is not as accurate. I prefer deploying him near the back, as that means he can actually get some late game value.
Now for Snorbo. Snorbo occupies an interesting niche of ‘most accurate yet painless’ fighter in the warband. He doesn’t do meaningful damage but he hits almost any attack, and notably, staggers. He is very frail and has the second worse Save characteristic in the warband when inspired (though it is still pretty good). He almost always is the farthest most piece for me, as his Range allows him to damage opponents from safe positions while his three move allows him to take some decent token control. Something to keep in mind is Snorbo cannot benefit from the dice/damage buff of the dub without upgrades, making him slightly weaker in late game especially in an aggro deck. Inspiration wise, Snorbo is usually one of my last guys because while his accuracy gain is notable, his reliable one damage isn’t very useful contrary to other Loonknight’s Two Shields or Damage.
Finally, Moonface Nagz and Pointy Burk. They have exactly the same stats and are therefore in the same section. Uninspired, they both kind of suck in every department unless they get dubbed. However, upon inspiration, they become super tanky going to 2 Shields on save. This makes them very annoying weapon caddies and good candidates for stuff like Burrowing Strike. What is also notable is dubbing them with all bonuses active lets them go to 4 move, 4 swords, and 2 damage. This is actually pretty strong, which makes me often deploy these guys closer to the back in order to make use of this better dubbing and to make sure not to give my opponent early free kills. In a passive plan, especially for PnP, Two Shields is super valuable and going in a cover hex makes them very annoying. Also if you need to sacrifice someone pick Nagz and never Pointy Burk.
Despite me repeatedly saying that there is an inspiration order for these guys, it’s actually a lot more flexible than that. Many Thundrik players probably know this – yes, inspiring Drakskewer is the ‘best’ option usually, but in this specific case inspiring Lund for his +1 Range is better. It’s the same with these guys. Make sure to take careful note of game state when picking who to inspire. Sometimes you want to inspire Pointy Burk instead of Snark because Snark already charged out and his +1 dice isn’t useful anymore, while Burk’s +1 Save can save his life. Just keep this in mind when inspiring these guys.
Another important thing to keep in mind is how much fighters each quests inspires. If you already lost one uninspired fighter, sometimes it is worth just accepting and abandoning Slay da Horde since the inspire won’t be helpful anymore (as it only inspires one guy – the rest of your quests add up to 6 fighters inspired) but accepting the quest gives a bonus.
HOW TO DUB PROPERLY
Dubbing is the only interaction you can have with your warscroll outside of tactically accepting quests when needed and not all in round one in order to activate all their bonuses. This means that dubbing is super important to learn.
First of all, in Round 1 your dub is going to not be very impactful and that is ok – just make sure to at the very least use it for something. The best uses for it include getting +1 Dice from Slay da Horde to strike down a priority target, getting +1 Move from Go Forth and Wallop in order to reach a crucial token and score lots of points from it, or my most used case and arguably the most effective, simply dubbing a fighter to hold a token with them and draw 2 power cards from Conquer da Realm. Bonus points if you somehow manage to make that fighter still activate in the rest of the round! The third case is probably the best case as it sets up two very strong inspired while also giving you two cards – a major momentum boost that could be leveraged for a quick turning of the tide in your favor. Overall, for early game and round one in general, don’t fret if you have a ‘bad’ dubbing – as long as it achieves literally anything that a non-dubbed fighter could have done – you made a decent dub.
In Round 2, your goal is to start using dub more offensively or just in general to keep achieving your goals. Especially in an aggro deck, the best case scenario would be Grib getting dubbed and leveraging the +1 dice bonus for several activations. This is a pretty rare thing to occur but is amazing when it happens. Another good use case, especially if Grib is dead, is making a surprise fighter much stronger with both +dice and Grievous from both quests – but this requires having both offensive quests already completed. However, if an unimposing Snark randomly goes to 4 dice and 3 damage, that does often do some decent damage to your opponent. Something I cannot stress enough is the Move bonus you get from dubbing – in a passive plan, this could be the difference between losing 6 glory from cards like Broken Prospects/Torn Landscape/Set Explosives or not. Something you shouldn’t do is dub someone in your very first activation only because you are worried you are about to lose that fighter. Even though Snark may be one activation away from death, dubbing him won’t save him. This is different from for example, winning the roll off and having your vulnerable Grib get dubbed for the extra dice for one last charge. This is because Grib is actually benefitting from the dub. Snark on the other hand (in our example) is getting dubbed just for the sake of it. If you are struggling to comprehend using dub for one-and-done strikes, think of the dub as an on-demand Determined Effort + Twist the Knife + Senseless Haste. Imagine that on a warscroll, three times per game! That’s dub.
Round 3 is a special case. This is the round where you have to make dub count the most. The reason PnP is so good for these guys is literally only because of Burrowing Strike – and the fact that it benefits from dub. If you have a fighter with it in Round 3 who can use the dice/damage buff multiple times, consider dubbing them. Overall, your goal for the round 3 dub is to either leverage it multiple times if you are behind in glory (because multiple dubbed swings can definitely tip the scales) or to use it as another one-and-done strike. Of course, another underrated use is dubbing one of your last surviving fighters and leveraging the +Move in order to outrun your opponent and deny them free points.
Dub is a very powerful tool and can’t be ignored. It is vital that you use it each round even if it’s just for one activation. A mistake I made early on in my career is accepting the quests for the better dub bonuses first – this is a trap and a mistake. Your primary goal especially in early games should be to inspire – hitting a strong attack is not usually. As I said already, if you have trouble grasping the fact that your dubbed fighter might not activate more than once think of dub as a Determined Effort + Twist the Knife + Wings of War all at once. As a warscroll ability. Of course, if you can get a dubbed fighter to strike multiple times it is all the better!
SPECIFIC TIPS: AGGRO
So my number one tip with the Looncourt and aggro-ing is to play Gitz instead because they do exactly what you want but better. If you’re still here, it’s because you like the Looncourt – which I respect! Now that all the Grinkrak doubters are away, I can let you know that the Looncourt aren’t actually bad at aggroing – they are just slow to get started and easy to punish.
Some good deck pairings for them include BA/PnP, which is the one I had most success with of the aggro decks, BA/CtC, which is probably the most synergetic as it allows you to get rewarded for Conquering da Realm with Set Explosives while also giving many pings, and if you are feeling spicy, BA/EotK actually worked decently well for me as long as my opponent didn’t have Great Fortitude! These are the ‘standout’ deck pairings but obviously something else can work too – I personally want to give RS/PnP a try.
Here is how a typical game for me playing a more aggro focused deck will look like:
For objective placement – it is SUPER important to get two things: one token far back in your territory, and one token close in enemy territory. What this does is it sets up an easy Conquer da Realm while also setting up a Go Forth and Wallop later one. In deployment, I try to deploy Grib and Grinkrak closer to the midboard to prevent early losses. Ideally I don’t lose any fighters in Round 1 but that is usually difficult to arrange, so sometimes (especially against warbands with no instances of three damage) I deploy Grinkrak or Grib closer to the front, or sacrifice Nagz. Skolko and Pronk are usually far back to leverage their Range 4, but against slow warbands they also like to be deployed mid board. Burk and Snorbo are usually not sacrificed and in this case they are often deployed far back and preferably next to some treasure tokens.
In Round 1, I prioritise inspiration as well as keeping fighters alive. The first activation is almost always a charge with Skolko & Pronk onto a treasure token in order to set up Conquer da Realm. By activation 2, I aim to have scored Conquer da Realm WITH a dubbed fighter in order to get two cards as well as Grib and Grinkrak inspired. A mistake I made early in my Grinkrak career is accepting the +Dice and Damage quests in order to get early dubbed charges – don’t do this unless you can score the quests – Grinkrak is more of a late-game warband, doing best when their good stats are actually alive and buffed up to be used. Activation 3 and 4 are much harder to predict but I aim to score at least one more quest by then – usually it’s Go Forth and Wallop for a double inspiration. What is super important to do in Round 1 is try to get at least one Grib charge or attack in where he doesn’t die instantly after – this creates a lot of threat for your opponent, as in several matchups games are often decided in R1 by a 3 damage hit onto some unfortunate fighter.
During Round 2, I try to leverage Grib as much as possible before he dies and don’t fret a lot if he does. It is important to have accepted all 4 quests by at latest activation one of Round 3, so this is the best Round to do so. This is also the round where your dubbed bonuses actually start being helpful – so leverage those! Burk and Nagz should start moving closer this round as well with some weapon upgrades, and Snark is likely to be traded off this round for another stronger piece. I like to dub him before doing so for the extra bonuses. Grinkrak is also crucial in this round. What often happens for me is he is in kill range in activation one, so don’t miss your chance and try to use him before he dies. Round 2 is often a difficult one to predict, so here is a general rule of thumb – try to transition into a more offensive plan, try to use your strong fighters at least once before they die, don’t forget to dub someone. The ideal Round 2 will have dubbed Grib activate several times in a single round but these kind of rounds are far and few.
Round 3 usually goes one of three ways – either you are absolutely in the lead, Grib is still alive and buffed up and just killing everything, or you are pretty much tabled, or your main threats are dead and your opponent is about to find out what Nagz and Burk and Co. really do and why they should be focused next time. In case 1, I guess just don’t get too full of yourself and keep making sure to deny your opponent their stuff. If this case somehow ever happens you probably won already (it has happened to me a solid one or two times). In case 2 (the tabled one), you probably already lost. Obviously you still have at least one fighter and the Looncourt is one of those warbands who can still comeback with just one guy. All you need is one thing – to get dubbed. This immediately makes you a threat. “But what if the last fighters include Snorbo or Skolko & Pronk?” Then you better pray for Burrowing Strike in your hand 🙂 . In an aggressive play style, losing a lot of your fighters can seem daunting but just keep fighting with your last fighters and there’s always a chance. Before you get semi-tabled your goal is to score your first two quests as well as your positional objectives – the rest should flow pretty easily even with someone like Nagz left alive. Finally, in the case where your strong guys are dead (namely Grib and Grinkrak), you are actually still in a VERY good shape. Now it is super important to maintain your advantage. If you have two or more opponent bounty already slain (enough to overcome the bounty your opponent got from killing you), you should play more passively – maybe go for one or two charges with someone like a dubbed Inspired Snark for another bounty or two. If you are at a bounty disadvantage, you want to first make sure you are still scoring your objective cards (super important in the aggro play style – especially your flex objectives like Set Explosives/Broken Prospects) and then go in for some more kills – just enough to get to bounty stalemate where both of you have the same bounty dead! If one of your two shield guys is inspired, you want to try to move them in front of your other guys to draw fire as they are much harder to hit and can hit farther (Skolko and Pronk) and harder (Nagz and Burk, dubbed). To sum up, the key to a successful round 3 is proper leveraging of dubbed.
SPECIFIC TIPS: PASSIVE
Passive Looncourt is very fun to play and I love my Loonknights being unhittable due to their high Save. This is a very annoying playstyle if played right, as it seems so easy to punish and frustrates opponents when the little goblin guy can’t be killed by a Stormcast and then scores 6 glory without attacking. Some pairings for this playstyle include PnP/CtC, a classic and that has been tried and tested. In fact, my best game with it has been me getting pretty much tabled and hitting a solid two attacks but still winning. Another fun pairing to try is PnP/EotK. You have to flex a bit more into combat but your opponent is deterred from attacking your three wound guys. Finally, be sure to give ES/PnP a try. While on paper it doesn’t seem too good, it’s REALLY passive and lets you keep as much knights as possible alive. A note on Emberstone Sentinels – while the power cards are very good for the Looncourt, and the objectives are scorable, the fact that they cannot score Supremacy makes this deck really hard to justify in a passive plan. It does much better in a ‘flex’ playstyle, where you can get some other two glory end phases to supplement glory bleed – try ES/RR sometime!
Deployment really matters for the passive plan. First of all, you want as many tokens in a safe place as possible. Define ‘safe’ for yourself and put your tokens there. For fighters, Nagz and Burk actually are more important than Grib and Grinkrak for holding due to their high save. This doesn’t mean you should ignore those two entirely – they are still your best attackers. Just try to keep Nagz and Burk safe until they inspire. Same with Skolko and Pronk as well as Snorbo. What this leads to is Grinkrak and Grib often deploying closest to the midboard, Snark somewhere in the middle, and the rest of your knights scattered around the back.

Now a word on Grib specifically in the passive plan. I may have been underselling him – he is still by far your best piece in this plan. He boasts a ranged attack with very good damage, allowing him to get on tokens and threaten kills too. He has the best move in the warband, and the second best save inspired. To top it off, he has three health, making him a nuisance to remove. This means ESPECIALLY in the passive plan he is your key fighter. You have to squeeze the most use out of him, and there’s two ways to do that. One, just play him normally – run around (safely) and poke people (not so safely). Stay on tokens, and use him for your aggressive needs (like if a token that needs delving is deep behind enemy lines). Or, leverage the fact that your opponent is going to be hard targeting Grib and use him to draw fire by making him SUPER hard to hit. Obviously a risky strategy, but super satisfying to see work.
Now to talk about a ‘typical’ game. This can go two ways depending on who gets to place three tokens but I will try to generalize it either way. First of all, early on you should be setting up for a Conquer da Realm in order to get Grib and Grinkrak inspired, as well as get two power cards for the next step. Depending on how safe it is, I like to also try and squeeze in a Go Forth and Wallop in order to end Round 1 with 4 fighters inspired. This is super important, as the faster your knights have access to their two shields, the better. Since you drew some power cards off of completing Go Forth and Wallop, it is more likely you have a guard ploy or some other method to stay alive. Your ideal first hand should include either Torn Landscape or Broken Prospects (or Iron Grasp) so aim for one of those in the first round for sure. If you don’t draw into any, make sure to get into positions to set them up.
In Round 2, you should have about 4 fighters inspired (some of them may be dead) – Grib, Grinkrak, and likely two of Skolko & Pronk, Nagz, or Burk for their two shields. In Round 2, you should first aim to score your two glory objectives – these are the key to each passive gameplan. If you are playing against an enemy passive player (which you likely are), you want to get some kills with Grib (or anyone but he is the best at it usually). Try not to lose him in the process – most of the time his model being on the board is threatening enough. Round 2 for passive is hard to predict because it seriously depends on your card draw and your opponent’s choices, but you should hopefully aim to transition a bit into killing (but carefully) as well as aim to score your 2 glory cards to have a chill Round 3. Also, do try to complete the final two quests – but DON’T tunnel vision on them.
Finally, Round 3 usually has two clear gameplans. If you are behind on glory and have already scored most of your big cards, then you have to make a play with one strong dubbing and Grib or Burrowing Strike (or anyone else but those two are the best playmakers). If you are ahead in glory, or will be because you have several big scores lined up, you have to make sure to keep it that way. Throw your guys on guard to make them EVEN harder to hit, get in cover hexes, or do the age-old strat of ‘run away in fear’ – works all the time if done right. One thing to keep in mind is that dubbing a fighter also gives them +1 move – in Round 3 this extra hex can be the difference between a close victory or a crushing defeat. In general, Round 3 is going to be the swing round – you either go to make a play to overcome a disadvantageous position, or leverage your superior defense and sit back more passively to deny your opponent some scoring.
Overall, a passive Looncourt will aim to leverage Grib as the ultimate piece on the board as well as your warband’s VERY high Save dice in order to become very annoying to displace from positions of tactical advantage.
MATCHUP QUALITY
Obviously this depends a lot on your deck but in general the Looncourt have a favored matchup into elites, especially ones with low save, because almost all of your fighters get Grievous against fighters with 2+ bounty. Against elites, I like to try focus them down one guy at a time. It usually takes one or two shots to kill a guy – your knights hit suprisingly hard.
As a warband, the Looncourt REALLY struggles against warbands who have no two bounty fighters. This makes them pretty bad in the current meta. The main reason for this is you lose out on the Grievous from Slay da Scary Fing as well as the two inspires that it gives your Loonknights. This makes it very difficult to inspire and you have to pick two of your guys to ‘sacrifice’ their inspiration. Normally, I would say it would be Nagz, because he is the same as Burk and you can just inspire him instead, and the second one would probably be either Burk, Skolko and Pronk, or Snorbo, depending on your game. The other three fighters are too valuable against hordes due to their native two damage.
QUEST’S END
Overall, Grinkrak is a very fun warband. They start out pretty slow but once inspired, dubbed, and upgraded, they start hitting like a truck while matching one in durability too. There are certainly warbands who do stuff that they do but better, but if you enjoy slowly setting up for a massive strike then do look into these lunatics! They can play a variety of different playstyles well and also offer tons of roleplay potential.
I already gave some example decks in the article but I put a lot of Looncourt decks up on our Nemesis Deck Repository as well – be sure to check it out if you want some more loony decks. If you enjoyed this kind of extensive guide article or have any feedback for me, please do let me know on the Staggerers discord. With that, good luck completing your quests, and I hope to see you again soon!
