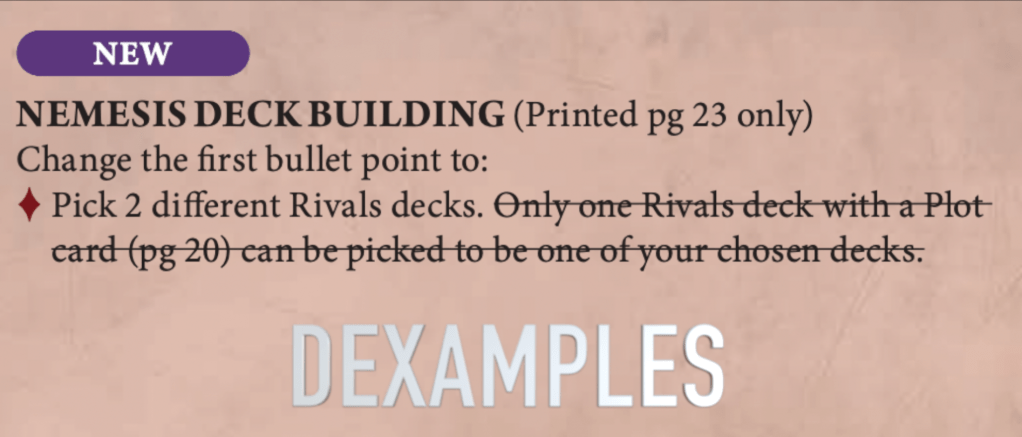
Ben: Hi, Michael and Ben here and today we will be discussing about plot-free decks, basically decks that weren’t legal before due to having 2 plot-locked decks that are now legal. This change has created 6 cool deck combinations we weren’t legal before. We won’t be sharing Deadly Synergy decks, as we have already made a Dexamples for that deck with all double plot pairings already included, which you can check out here. But without further ado, let’s start with our first deck!
Raging Slayers/Countdown to Cataclysm – Jaws of Itzl
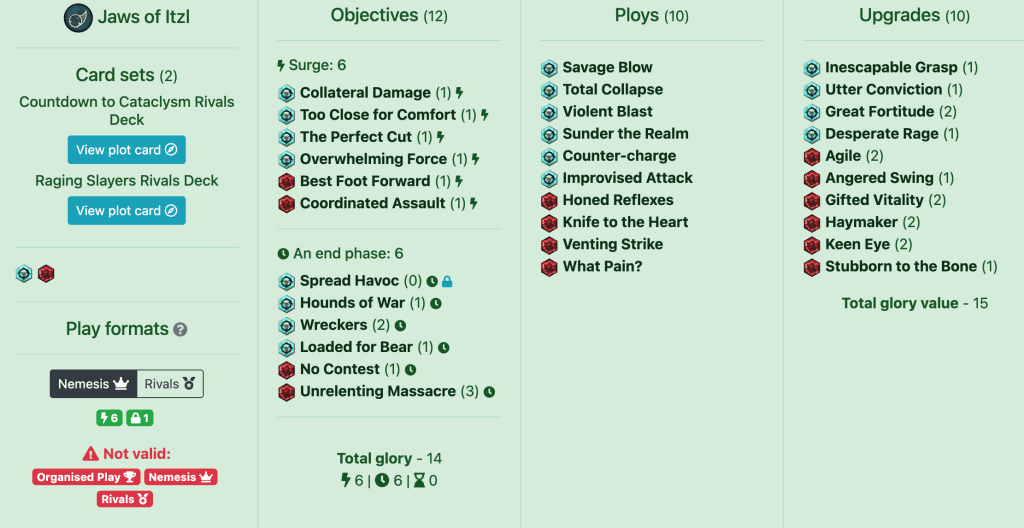
Ben: I think Jaws of Itzl could work really well with this pairing. They hit on 4 swords, so you know they need the reroll and they can use the ping found in Raging Slayers (Knife to the Heart) to great effect. Countdown to Cataclysm is a natural second deck now, as it has 3 pings for consistent inspirations.
The Surges are quite powerful. You will be playing aggro, so being close to enemies with Too Close for Comfort is very likely and attacking for Best Foot Forward and The Perfect Cut is also not hard. All your Dinosaurs inspire to 4 swords, so having 4 attack dice for Overwhelming Force is also pretty realistic and the Venomites dying or you being the underdog (which will be often) gives you Collateral Damage. The only tricky card for the surges is Coordinated Assault, for which you need the snakes to die or to charge, which could limit when you score it, but you have multiple ways to kill your own snakes or to make charging with them actually useful, so I think the card is fine.
The End Phases mostly require attacking, which is quite good as we are in fact playing an aggro deck. Hounds of War and Wreckers count damaged and slain fighters, something that you will be doing while attacking while also being buffed by the multitude of pings this pairing has access to. Unrelenting Massacre is pretty powerful as the opponent has to play around it and the venomites are fine here for the same reason as for Coordinated Assault. No Contest might cause some problems if the opponent wants to protect their leader, but it is only 1 glory, so it can be discarded if you don’t think you will score it.
This deck pairing has a really powerful power deck, especially for Jaws. The ploys are really good in this pairing. The reroll from Honed Reflexes makes the ping on shields more consistent while the 4 pings also help with inspiration, especially Sunder the Realm as that could inspire multiple fighters at the same time. The surge accuracy cards are really powerful in this deck as well, as, especially uninspired, the Sauruses don’t hit that accurately.
The upgrades are also very powerful, giving extra defence and offence. Desperate Rage might be the best upgrade in the deck, as giving your Venomites a 3 dmg attack and removing them from the board can both be major benefits. Angered Swing has the same use case, but it keeps the Venomites on the board. Utter Conviction and Agile also increase the chance you defend against attacks and ping the opponent to inspire, making them especially good with this warband. Stubborn to the Bone might seem a bit strange, especially with no positional end phases in the deck, but allows for way more aggressive play due to not needing to worry about getting pushed for Strip the Realm or Pinned and allowing for more powerful charged out activations.
I think this pairing could be really powerful and especially with Jaws might be worth trying. The combination of aggro and pings that can finish off the target is very good, and getting a reroll on top of that makes this pairing look really interesting.
Strengths:
- 4 Pings and 3 defence upgrades to help inspire your fighters
- 4 accuracy buffs to get the dino attacks to hit
- 2 powerful weapon upgrades to turn the Venomites into a feared threat
Weaknesses:
- No cards to make Unrelenting Massacre easier while it also takes up a majority of the scoring
- Most pings are dice dependant, meaning you could go multiple games without inspiring
Edge of the Knife/Raging Slayers – Thorns of the Briar Queen
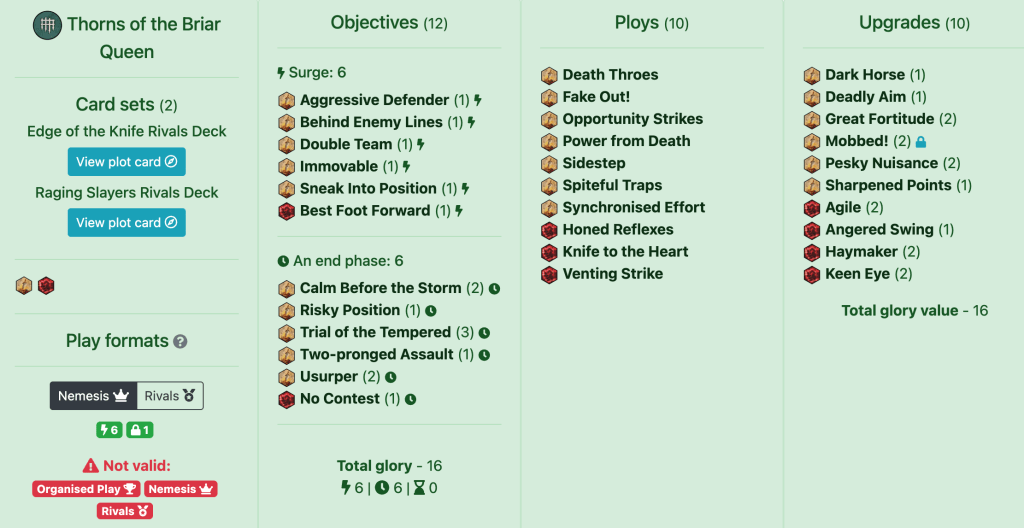
Ben: Thorns of the Briar Queen seem like an obvious fit for this pairing, as they start with 5/7 tempered fighters and can teleport 4 times per game while giving surrounded, making attacks decently accurate already. They also all deal 2 dmg per attack inspired which would, on a hit, temper the target. The Slayers reroll is really appreciated here, as the accuracy of the attacks being higher would be really nice and the Slayers power cards are really good.
The Surges reward you for attacking your opponent, which is exactly what you want to be doing, however most of them do require a bit of positioning one needs to remember. Aggressive Defender and Behind Enemy Lines want you to attack on a treasure token and hold a treasure with a tempered fighter, which you can set up with some of of your mugs. Double Team and Sneak into Position want you to swarm a single fighter with two of your fighters, something that is also quite simple if you use your teleports and still doable if you don’t have them anymore. Finally, Best Foot Forward and Immovable require very little, if any, set up to be scored and are pretty consistent.
The End Phases reward you for … attacking your opponent and invading their territory. Risky position and two-pronged assault want you to invade the opponents territory with tempered fighters, which get easier with the 4 teleports you have. Usurper and No Contest both require you to kill the enemies leader, something that gets simpler with the mug that teleports you to the leader. However, these cards can be drawn in the wrong order by drawing No Contest before Usurper, in which case you would need to discard one of them as you can’t score No Contest in round 2 and the Usurper in round 3. Trial of the Tempered is also a bit risky, as you can’t temper both of your 3 wound fighters and if you give great fortitude to a small ghost you would need to temper 3 of your fighters, however the two 3 wound fighters also are the most threatening and are often targeted anyway.
The ploys in this deck are very powerful, as the accuracy tools from Opportunity Strikes and Venting Strike allow you to hit with incredible accuracy while the two pings allow you to find kills you usually shouldn’t find. The survivability of the fighters is also increased with Spiteful Traps disallowing threatening charges and Death Throes and Honed Reflexes giving your fighters a valuable defensive boost. Synchronised Effort has a very cool use case in this deck to switch two fighters that are adjacent to the enemy and allowing more fighters to inspire.
The upgrades are very good, as the extra accuracy from Keen Eye or cleave/ensnare is always appreciated. Haymaker here is especially valuable as it literally doubles your damage and your attacks are very accurate. Mobbed might seem a bit strange, as we are trying to surround with our warscroll anyway, but in round 3 a lot of ghosts will have already died, so getting that accuracy more consistently is much appreciated. Dark Horse is very important to attach later rather than sooner, as the opponent can target the fighter that has Dark Horse equipped without needing to be scared about Trial being scored.
I think this pairing could work with Thorns, as their teleports help with moving tempered fighters around and swarming the leader for the kill leader objectives, while the extra surrounded from the warscroll and all the fighters being on two damage makes these ghosts very scare to face.
Strengths:
- Surrounded and rerolls make attacks incredibly accurate
- Teleports help to score objectives pretty easily
- Allow for prioritisation of targets (usually the leader)
Weaknesses:
- Pretty dependant on teleports, making late game scoring less consistent
- Trial of the Tempered and Usurper are quite inconsistent and make up for 5 out of the 16 glory total
Raging Slayers/Realmstone Raiders – Ironsoul’s Condemnors

Ben: Some of you might question how one could pair the two decks most known for having unplayably bad objectives, and so am I, but the pairing might work with Ironsoul’s.
The Surges are pretty bad. A Sure Bet, Critical Risk and Ragerock Strike are mostly scored in the same way, which is hitting the opponent. This should be easier due to the Raging Slayers reroll and the high accuracy of the Condemners, and flipping an Emberstone card, however, having two luck based events (or three in the case of Critical Risk) tied to a surge is still quite annoying. Supreme Slayer requires your leader to get 2+ kills, which is also doable, but requires Ironsoul to survive, something easier said than done given that she needs to also get kills, while Coordinated Assault and Best Foot Forward both want you to charge in to enemy territory, which is pretty easy and the most consistent surges in the deck.
The End Phases are stronger than the surges and give you a 17 glory ceiling, however there are still a couple of bad cards in here. Into the Fire once again requires you to play aggressively and defensively with your leader, as they need to survive. Roused Violence is better than one might expect, as the matchups in which it is the hardest to get a lot of raids are against swarms that are often Pillaging and Plundering across the battlefield, making this card less difficult to score (but still not very easy). Hoarders Hovel is the worst card in here, as you want to rage, but that guarantees drive back for your opponent to knock you off of the token. If you have the last activation though, you can simply move on a token 2 or 3 to score this for 2 glory.
The ploys are mostly fine, however we did need to sacrifice a couple of slots to Emberstone Ploys. Hidden Knowledge is interesting, but mostly included to be another Emberstone card and Misstep, while being useful to get another reroll, is also mostly in here to get a Emberstone card into the deck. The highlight of these ploys are the three very powerful defensive buffs in Honed Reflexes, What Pain? and Manipulated Fate, allowing for these already quite tanky fighters to just soak up more damage.
The upgrades continue the trend of having a lot of very powerful cards and then a couple of Emberstone cards that needed to be included for the objectives to function, namely Brightstone Vigour, Call to Power and Forgotten Fortune. These power cards also continue increasing the incredible defensive power of these Stormcast with extra wounds and heals from Great Fortitude, Brightstone Vigour and Gifted Vitality. The two extra damage cards in Great Strength and Haymaker are also very powerful, especially with the accurate attacks these fighters already have.
I think this deck could work, however the surges are not very consistent and are either luck based or pretty easy to deny. The fighters do hit pretty accurately though, especially with the slayers reroll, and have a lot of survivability with 7 power cards that help with defence. This is an interesting variant of building elite aggro and might be worth trying out just for that.
Strengths:
- Passive card advantage and accuracy buffs
- Very defensive and hard to kill fighters
- Can threaten incredibly accurate kills out of nowhere
Weaknesses:
- Surges are inconsistent and easy to deny
- If you don’t raid the right cards the right time you might auto loose
Countdown to Cataclysm / Edge of the Knife – Sepulchral Guard

Michael: I had to beg to do this part of the article cause this was literally my dream no-plot pairing and I spent half of EotKs lifespan praying for plot lock to be lifted and almost gave up hope… anyways, we HAD to roll with a warband I liked here so give it up for Sepulchral Guard!
The objectives focus a lot on tempering. In the surges department, I took stuff that guard can do decently well. Power in Numbers may seem questionable but with a double Raise it is very easy – sometimes you can even only Raise 1 fighter to meet the underdog condition! Shoutout to The Perfect Cut being very easy with the Champion too, as well as all your Cleave/Ensnare tech in the deck. The Surges overall are quite consistent! The end phases too – Calm Before the Storm may be a little hard with 7 fighters but they all die in one hit. Set Explosives is insane here with the double move. Finally, Trial of the Tempered itself is also relatively easy with all of your 2 damage and decently accurate fighters! Pings also make it easy.
The ploys are super fun – for starters we have 4 pings to help us make enemies Tempered and this is the main reason this deck pairing is so good. Violent Blast also deserves a shoutout as you can push enemies apart for Calm Before the Storm. Death Throes lets the Warden take a second hit, and Opportunity Strikes is just fantastic on this warband. Notably I did NOT run Power From Death but that’s personal choice – it’s definitely a strong card here. Growing Concerns increases the Warden’s chance of survival by about 38% per game. Overall, a lot of the ploys are here to make killing stuff easier for Trial of the Tempered.
Finally, MASSIVE shoutout to Visions of Ruin in the upgrades. It can TRIPLE the Guard’s move which is funny. Utter Conviction is bonkers on the Warden. Desperate Rage allows a second tempering method for the Warden without drawing Dark Horse! We ran both Cleave and Ensnare for some added accuracy, needed to temper stuff. Impervious is here to combo with Utter Conviction and make someone literally unhittable – it’s funny when it goes off!
Overall, CtC and EotK have great synergy – the pings and durability ploys from Cataclysm pair super well with EotK’s cards that need Tempered fighters but ideally some fighters still on the board.
Strengths:
- Not much positional requirement, can focus a lot on killing
- Warscroll abilites work really well for the playstyle
- Very good survivability tech
Weaknesses:
- A lot of attacks necessary, meaning not much time to Raise
- Loses to Great Fortitude and Healing Potion unless prepared for, which is hard
- Very susceptible to getting ‘outrun’ with your glorious 2 move.
Edge of the Knife / Realmstone Raiders – Zarbag’s Gitz

Michael: The Gitz have pretty strong accuracy which makes them decent with Realmstone Raiders. What makes it even better is you can play a lot of RR cards, but not play much RR objectives, as Gitz score most EotK stuff by themselves!
In the objectives department, we take only 3 RR cards – Ragerock Strike is very easy, Realmstone Raid is very easy, and Roused Violence lets you pretend you are playing PnP. I took both Two-Pronged Assault and Risky Position as I didn’t really want too much Raiding stuff, and Gitz can score both easily. In addition, Trial of the Tempered is very strong with Gitz for their high accuracy as well as Snirk being a model on the board who can temper your own fighters! Overall, a lot of the objectives don’t require too much gameplay deviation but do need a lot of successful attacks – something Gitz can often arrange.
The ploys are mostly Realmstone stuff because we need to Raid often. Notably I didn’t take Power from Death to make sure I don’t draw into RR stuff. Fortune Faded is a CRAZY card here because it can Temper someone after an archer shoots them! Fake Out allows for some kills as well. Other than those cards, we have the usual Emberstone Ploy package on top of some strong EotK cards.
We only take 3 upgrades from EotK, one of which is Mobbed – a very insane accuracy buff. Parting Shot is always great. I took the ‘Great’ package but skipped Great Speed cause it wasn’t an Emberstone card and I needed to cut one more upgrade. The goal here is to not have too many Emberstone stuff and focus more on ‘useful’ cards, which is mostly achieved. Obviously some Emberstone upgrades make it in because they are useful, namely Forgotten Fortune and Reforged Aid. Emberstone Edge is also here because we want the archers to be a little more accurate, and might as well play another Emberstone upgrade for some more reliability!
Overall, the deck focuses more on Tempering rather than Raiding but it can do both – the most important part is hitting attacks. If you can do that, odds are you will score stuff. The power cards don’t complement each other perfectly, but there is some synergy involved, especially with pings and accuracy upgrades!
Strengths:
- Hit stuff = glory
- No need to kill anything
- Raiding allows for really good control over when to Focus to draw a card you need, like Fortune Faded to score Trial of the Tempered.
Weaknesses:
- No hit stuff = no glory 😦
- Lots of archers cannot raid, which is circumvented by Emberstone Edge and not much raiding cards
- Very matchup dependent – SUPER strong into elites but pales more into hordes.
Countdown to Cataclysm / Realmstone Raiders – Cyreni’s Razors
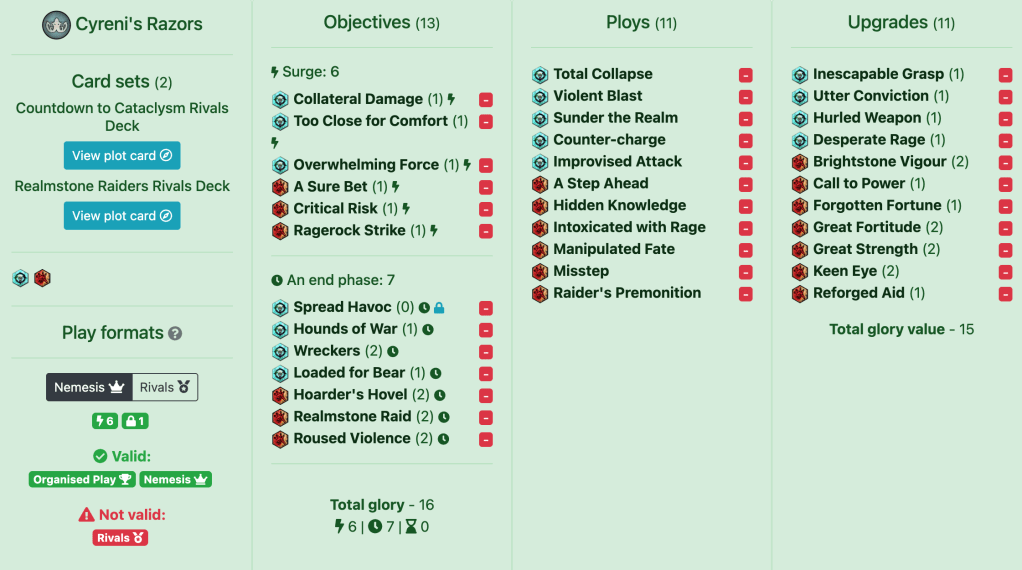
Michael: We are back with Razors action! Cyreni is GREAT for Raiders, as they have insane accuracy, and Countdown is great for Razors, mainly due to Utter Conviction but some other nice cards too. This creates a weird combo but one that might very well be effective!
In the objectives, I want to highlight how strong Overwhelming Force and A Sure Bet are. For the Razors, both of these basically read ‘hit an attack (and get lucky)’, which is super good! Too Close for Comfort I was trying recently and it works nice, doesn’t need dice unlike The Perfect Cut, which I skipped here. Critical Risk is worse Critical Effort and Ragerock Strike is worse A Sure Bet (for Cyreni) but both cards are still pretty strong, making the surges very reliable. End phases see us take Wreckers which might raise some eyebrows but I am a believer in the ‘ping plan’. If you aren’t, I recommend you take Set Explosives instead. Hoarder’s Hovel is scorable kind of easily, and Roused Violence and Realmstone Raid are both pretty easy with proper Raid mechanics. Loaded for Bear and Hounds of War (as well as Spread Havoc) are ‘autoscores’ to bump up glory count!
The ploys see us take pings which actually are detrimental to Raiding – but I cannot cut them physically. Since you probably can, it is optimal to cut Total Collapse and very very very maybe switch Sunder the Realm for Raging Tremors. Countercharge is great with Hammertides, and the Raiders ploys fit quite nicely with the general Razoring gameplan. Intoxicated with Rage personally I find is great on the Squid – do give it a go.
The upgrades have us take all the usual Cataclysm stuff, shoutout to Utter Conviction being OP and making your ‘fail an attack’ stuff super easy to proc. Desperate Rage is likely the cut here but I rarely leave home without it, as just having access to base 3 damage is very nice. We have the age-old combo of Reforged Aid and Forgotten Fortune here to make sure that we can spam stuff like Misstep or A Step Ahead (very funny for Hammertide btw). The ‘Great’ cards are super OP so we take them. This deck does have a slight problem when pairing Soul Harvest and Call to Power where you might draw too much cards making Raiding harder, but oh well – what can we do.
Overall, Cataclysm gives Raiders some nice passive glory if Raiding doesn’t go well while Raiders brings the heavy firepower in the upgrades. Ploys-wise, Cataclysm and Raiders both have potentially game swinging ploys but are quite niche – still fun to play!
Strenghts:
- Superb accuracy makes Raiding trival
- Passive CtC glory complements active RR glory very well
- Pretty much every single ploy can be game swinging.
Weaknesses:
- A little too much card draw can mean no more Raidable cards.
- Not enough time for much Hammertides – early game, they are still SUPER strong.
- Super round dependent – your R1 will almost always suck due to the way the decks and the warband works. (this is because Cataclysm needs a high value to be good, but you don’t want to draw Emberstone cards R1 – creating a lose-lose-rarely win scenario. Also Razors inspire per round, making them inherently weaker in R1).
Michael: And that’s it! Thanks a lot to you for reading – we hope you enjoyed the article! If you have any feedback or just want to chat with Ben or myself, please reach out to us on Discord. With that, I hope to see you again soon!
