Introduction
Quint: Back in Maastricht I went on a lovely walk through the town with Rob, and of course, we discussed Warhammer Underworlds. After talking about the newest FAQ and coming to the conclusion that I should play PP/RF Thricefold Discord, I happily said: “Oh, then I can take Tunnelling Terror to force some scoring!” Rob, probably confused, then asked me why you would ever take that card. Well, here’s the reasoning:
A second introduction
I should probably explain what Tunnelling Terror does first, so here goes:
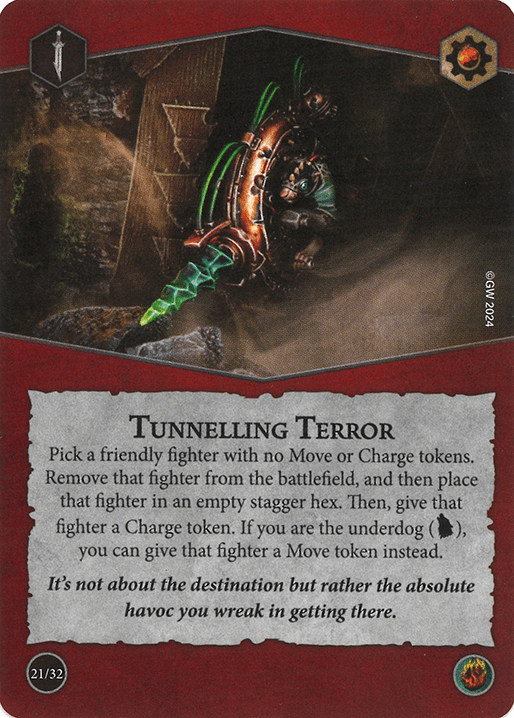
Tunnelling Terror is a Pillage and Plunder ploy card that allows you to pick a friendly fighter without any move or charge tokens and place them in any stagger hex, then give them a charge token, or move token if you are the underdog.
First of all, this card cannot target fighters with move or charge tokens. This means that you can’t use it to reposition fighters later in the round, when everybody has charged, and it get’s shut down by “lockdown” cards, such as Poor Footing and Crippling Blow, since they give move tokens.
Second of all, it has to place a fighter in an empty stagger hex. Since there are never more than two stagger hexes on the board, that limits your options to; A: Your territory, or B: Your opponents territory. The only exception is the Spitewood board with the Stagger token in the middle, giving you even less choice, and, since it’s in the middle of the board, it might be occupied for a large portion of the game.
Since the teleport can only go to a stagger hex, it’s kind of akward to trigger Canny Sapper (another teleport card from Pillage & Plunder) if you have Tunnelling Terror in hand.
Lastly, the card gives the picked fighter a charge token. Notice that is says you “can” give them a move token instead, so you don’t have to! Giving charge tokens is a double edged sword. On one side, it shuts down that fighter for the round, but on the other side, it might let you get Charged Out (more on that later). Move tokens are simpler, allowing the fighter to still take all of their actions (except charge). However, this still shuts down almost all of the power cards and Warscroll abilities that have a charge token restriction (like Scurry or Move at the Opening). For this reason, I’d almost always recommend giving a charge token, except when playing into RF or RS, as it gives you more flexibility in the end.
Fearful Mining
Let’s talk about the ways to maximize the use of this card. First up, you want to be using it to reposition a fighter to a better location. Since Tunnelling Terror cannot land you onto a Feature Token, it is important to think about what value you can get out of it. Using a Push gets you onto a token, such as Duelist or Sidestep. You can also use it to retreat a fighter that was a bit too aggressive in the previous round, or reach a fighter and attack them (more on that in a bit).
It is best used on fighters that already have a Stagger token or fighters that are planning on delving (and thus getting one) later in the round. This way, you don’t give your opponent free accuracy!
To maximize the Move/Charge token, think about the following:
- If all of your fighters have Charge tokens, it doesn’t matter if your fighter gains a Move/Charge token, since for them, they can still take the same amount of actions. However, if you give them a Move token, the other fighters can no longer activate. If all of your fighters have Charge tokens, it is best to give a Charge token (unless your opponent is playing Reckless Fury/Raging Slayers, and you aren’t)
- If not all of your fighters have Charge tokens, having a Move token allows your fighter to do everything they want (except charge), whilst having a Charge token completely shuts them down. So unless you think you will get Charged out before the end of the round, definitely give your fighter a Move token.
Talking about Charge tokens, when is the best time to play Tunnelling Terror?
Of course, it’s best to play it in your opponents Power step so that you get the element of surprise and they can’t stop it immediately. Since you need a fighter without a Move/Charge token, it is best to play it in the second or third Power step, since you can see what is going on, get Charged out and benefit from being Charged out! You should almost never use it after your last activation, unless you have a push in hand and can get onto a token!
Against Elite Aggro decks, wait to play it until all of their fighters have Charged. That way, placing a fighter deep in their territory means they have to move all the way back to attack them. Especially warbands like Ironsoul’s, Wurmspat and Gorechosen have low movement characteristics, so playing Tunnelling Terror can deny them a lot of attacks and glory, as they have a lot of objectives that require them being in enemy territory (Get Stuck In, Brute Momentum etc.), making a territory flip very favorable.
Against Hold decks, be careful when playing Tunnelling Terror, as they can often charge onto Treasures and attack you for free, getting them free glory and Tokens!
Now that we’ve covered the basics, let’s talk about how to use Tunnelling Terror (and when not to use it).
Tearing through the Competition
To talk about Tunnelling Terror, we need to analyse its spot in the meta, relative to other cards. To do this, we have to determine the things a Ploy needs to do to be playable in Nemesis:
- The Ploy must work towards the win condition of the deck it’s in (Pillage & Plunder)
- The Ploy must win condition of the deck it’s paired with.
- The Ploy must be better than it’s competition.
- The Ploy must work with the Warband.
Now, let’s see for each deck pairing if Tunnelling Terror fits all of the goals!
Warband Specific
Upon researching it, I was shocked to find out that there’s only two warbands that need to be in enemy territory to inspire! These warbands will just love Tunnelling Terror, regardless of what deck pairing you play. The first time I used Tunnelling Terror was in an ES/PP Looncourt deck, where you take three teleports to try and get as many fighters inspired as soon as possible by having 2 or more fighters in enemy territory.
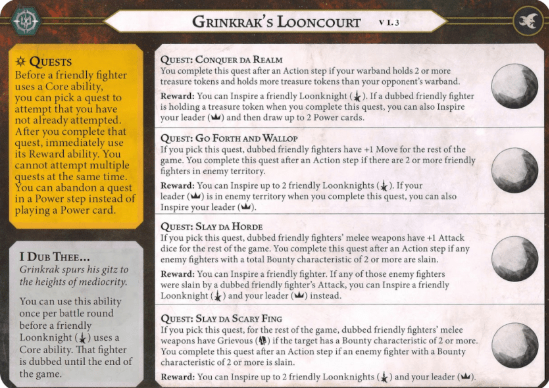
Tunnelling Terror made a lot of sense here, as you have a lot of fighters that are kind of expendable, so you can just throw a goblin into the enemy territory, and not care that it gets Staggered and a Charge token.
There are a lot of other warbands that love getting into Enemy Territory, mainly The Emberwatch, who can be fully inspired at the end of the first round if you use Vanguard Dash and Tunnelling Terror correctly. Meanwhile, The Shadeborn love being in Enemy Territory to get their re-roll in defense dice, whilst The Farstriders can use it to trigger their “Vanguard” ability.
Blazing Assault
Strangely enough, there aren’t a ton of interactions to have with Blazing Assault. However, that doesn’t make Tunnelling Terror any less good. In a BA/PP deck with a 5-fighter warband, being able to give a fighter a charge token can be huge! The goal of Pillage & Plunder in this pairing is to provide consistent scoring by charging onto tokens to delve them. Herein lies an issue, because without pushes, Tunnelling Terror is just a worse Canny Sapper, since you have to still take the move action (since you can no longer charge). Combined with the fact that there’s already so many good ploys in this deck pairing, you have to be really confident in Tunnelling Terror. Blazing Assault wants to be making as many attacks as possible, which Tunnelling Terror does help a lot with! So here, the power ceiling is really high, but there are some way more consistent ploys in this pairing. It succeeds in goal 2, but falls short on the others.
Warbands that like this card and also like BA/PP are midrange and have a consistent push ability, which allows them to reach far objectives and get charged out value. This also makes goal 1 achievable, and makes the card better than some other ploys. Some example warbands are:
- Elethain’s Soulraid
- Hrothgorn’s Mantrappers (consistent is debateble)
- Gnarlspirit Pack
- Emberwatch (they aren’t midrange, but their push is actually so good for this)
Reckless Fury
Oh boy, get ready.
In PP/RF, Tunneling Terror is one of the best ploys there is, and inspired me to make this article. If you’re playing with an elite or midrange warband (which you should be doing with PP/RF anyways), this card gives you:
- Another teleport
- Another Braced/Headcase/Catch Weapon
It can singlehandedly make Arena Mortis undeniable, score you Brute Momentum and make you Charged Out so your strong melee fighter can attack again. Give a fighter with a range two attack Furious Might and Duellist and laugh as you create an unstoppable machine.
It allows you to reach far off tokens, pressure enemies, or retreat a fighter at the start of the round without taking them out of the combat and/or denying yourself glory.
The main weakness of Tunnelling Terror, being that it gives you a Charge token, becomes a strength!
Also, relative to BA/PP, there aren’t that many must pick ploys here, giving Tunnelling Terror way more merit.
This means that is scores a perfect 4/4 as a Ploy, since it works perfectly for the warbands that want to take PP/RF (3-5 fighter warbands with some range 2 melee/ranged attacks)
Ok onto the next deck xd
Raging Slayers
Raging Slayers and Pillage & Plunder is a pretty good pairing, whose goal is to keep opponents off tokens and overrun onto them to delve them. One of the issues with this deck is that you can’t really “force” a Charged Out state, since you lack the necessary cards found in Reckless Fury. Tunnelling Terror however, comes in and saves the day. It allows you to Enrage more fighters by making you have Charged Out attacks earlier, and gives you some nice reach.
This means that Tunnelling Terror completes goal 2, but doesn’t really help goal 1, since you kind of get stuck there. There is a lot of push tech in RS though, so it could still work with a diabolical Shared Anger play.
The warbands that want to take RS/PP are those that have a lot of expendable fighters, with high move to knock opponents off tokens. Some examples are:
- The Thorns of the Briar Queen
- Blood of the Bull
These warbands do really like to get a Charge token, so Tunnelling Terror is pretty good!
Hunting Grounds
Hunting Grounds wants you to stay put and force opponents to come to you. Realistically, Tunnelling Terror doesn’t help, and also isn’t useful to score Pillage & Plunder passively. It only scores This is our Turf, so no, don’t take it.
Emberstone Sentinels
The goals of ES/PP are:
- Reach tokens
- Stay there
Sadly, Tunnelling Terror doesn’t really help here, since there aren’t a lot of pushes in this pairing. You could use it to get staggered and Charged out, then take a Move action and score Stand Firm, Step by Step and Sally Forth, but I wouldn’t recommend all three of those surges anyways.
On top of the mediocre usefulness, ES/PP has a lot of really good ploys already that truly allow you to stand your ground. Don’t take Tunnelling Terror unless you need it to inspire (eg. Emberwatch, Looncourt)
Nexus of Power
Here, there’s a lot of objectives that require you to just be within one hex of an objectie token, which Tunnelling Terror is great for, as it can score Lone Wolves, Break Out and Claimed! Combined with the insane amount of pushes in this deck, it’s definitely a strong pick, since it also allows you to make more attacks, which Nexus of Power wants. It does get outclassed by a few of the other movement/push cards, like Move at the Opening, so it scores goal 1 & 2.
It gets goal 4 for 5+ fighter warbands that want to take PP/NP anyways and can benefit from throwing fighters into enemy territory to score some glory.
Edge of the Knife
The weird kid, it isn’t really clear what EotK wants anyways, but mostly, it’s to get Tempered Fighters into enemy territory and to make attacks (to get fighters staggered). Therefore, Tunnelling Terror completes goal 1, 2 and 3, since there aren’t that many strong picks here. Also, combining this card with Commanding Stride and Spiteful Traps to snipe anybody on the board is absolutely hilarious.
The warbands that like EotK/PP are mostly hordes that have a few expendable fighters. These are the perfect targets to throw into enemy territory with Tunnelling Territory, so it works with them as well! Another perfect 4/4!
Countdown to Cataclysm
PP/CtC has had a pretty rough falloff, but in it’s current state requires you to take some weird surges. Sadly, Tunnelling Terror doesn’t really aid any of them, meaning goal 2 is void, and goal 1 as well. To make matters worse, the Ploy selection is very good for this pairing, making Tunnelling Terror pretty obsolete, unless you want to run a weird Elethain’s Soulraid deck that uses consistent pushes to get onto tokens (but at that point, just play BA/PP and take it there).
Wrack and Ruin
PP/WR is a very fun pairing with a lot of control elements, which relies on outmaneuvering your opponents. Tunnelling Terror can be used to surprise opponents and score Stay Close or Alone in the Dark, and since this deck contains Confusion, enemies have to think twice before stepping onto tokens next to Stagger Hexes.
The competition is rough though. Cards like the aforementioned Confusion, Fireproof and Ominous Rumbling are all pretty much auto-includes, making Tunnelling Terror a tough ask. Take it if you have an immobile warband that doesn’t mind being charged out (Thundrik’s Profiteers do it best).
Realmstone Raiders
First off, since this deck requires Emberstone Ploys, any non-Emberstone Ploy is going to be judged even harsher. Realmstone Raiders wants to hit attacks whilst Delving to score Roused Violence and Realmstone Raid, which Tunnelling Terror does help with by making you Charged Out, so it gets only goal 2 here, as the fact that is isn’t an Emberstone Ploy makes it a tough pick.
Deadly Synergy
The final deck! Tunnelling Terror can definitely help you set up United Charges and get Charged Out with big warbands, so it get goal 2 & 4. However, the Ploys here are already hard to choose (they are just sooo good), so Tunnelling Terror falls short on the other goals.
Misrecarded or better Discarded?
So, to answer that question, we have to answer the following (other) questions:
- Is my warband the Emberwatch or Looncourt?
- Is my warband a 4-5 fighter warband that would benefit greatly from a pseudo Braced?
- Does a Teleport help towards my win condition?
- Do I like a whimsical card that opponents won’t expect?
If you answered yes to at least one of these questions, definitely consider taking Tunnelling Terror! It’s a really fun card, but also has some limitations to play around!
That’s it for this article! It took a while for me to release one due to finals, but I’m back! You can find me at the Staggerers Discord server, where you can discuss your decks with or without Tunnelling Terror! Happy deckbuilding and have a wonderful day!
