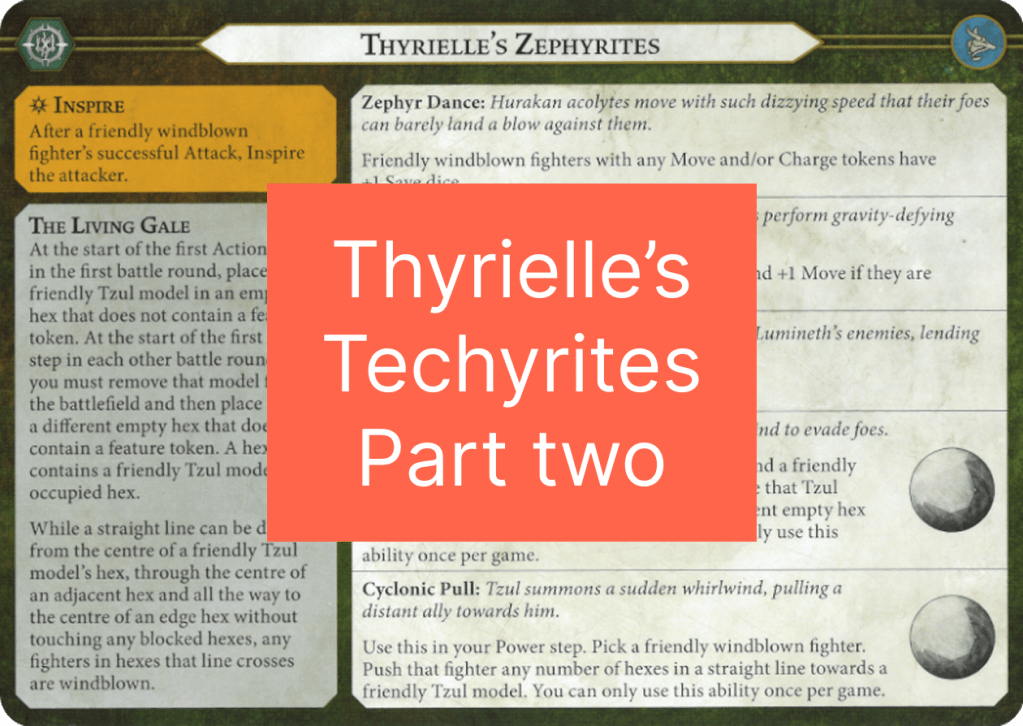
Quint: Welcome back to my Thyrielle’s Zephyrites deep dive! This is part two of the series, in part one we discussed several decks to play with them. In this article, I’ll go over Treasure token placement and 2 more deck guides.
Chapter 5: Token Placement
Soooooooo, I kinda made a mistake last article by explaining a visual concept with words… Anyways, here is, for no reason in particular, an analysis on token and Tzul placement with Thyrielle’s Zephyrites!
Roll off loser
First, let’s go over what to do when you don’t place the board, and thus place three tokens. Your goal is to secure at least two spots where Tzul can be placed and hits 3+ treasure tokens.
Example (token number is the order they are placed, and for all boards, a green and orange token are added to denote friendly/enemy territory respectively. Any additional orange tokens are other 3+ token spots to reposition to):
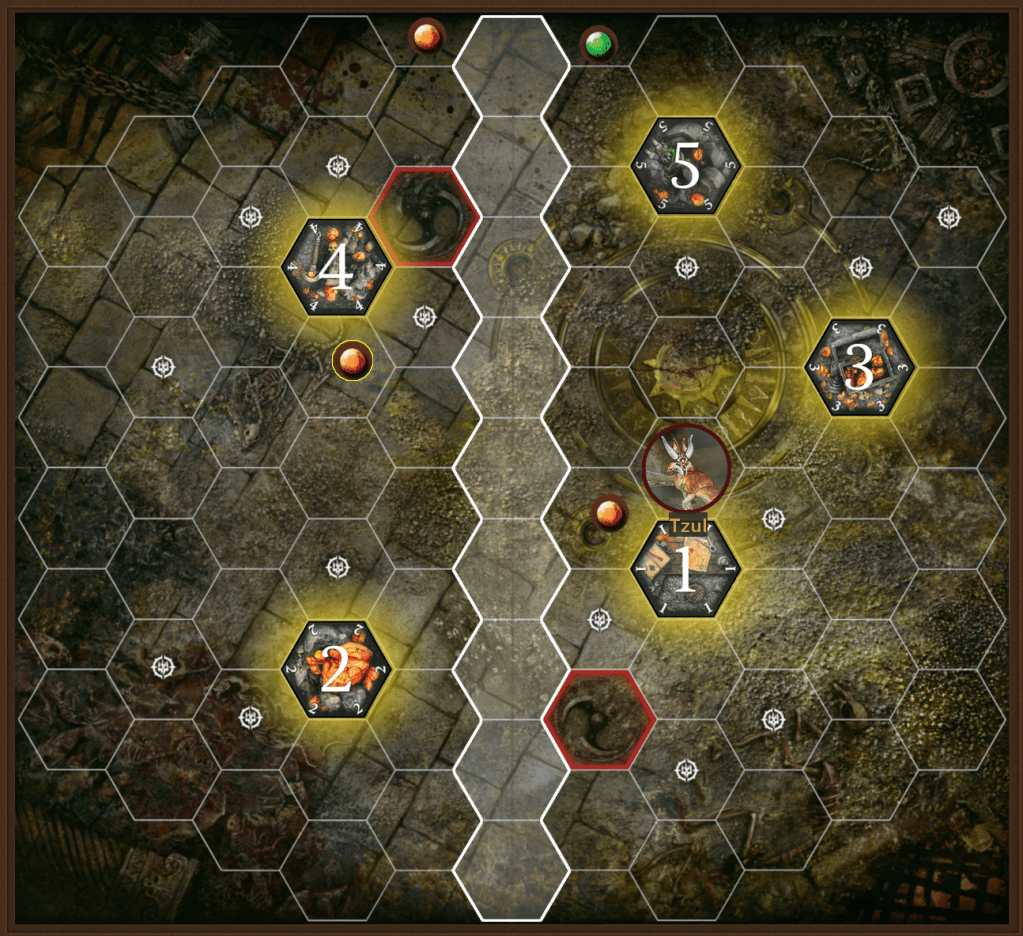
It seems weird, but it’s actually pretty common that you can get a 5 token Tzul. Here, we play reactively, taking space with token 1 so they can’t deny a middle Tzul placement. Then, my opponent places a standard 2nd token for a very normal gameplan of take and hold or flex. After two tokens are placed, you can ALWAYS place a third token so that you get a 3+ token Tzul. Then, my opponent thinks he’s smart by placing a token far away, but, as you can see, there aren’t a lot of places that he can go that don’t allow for me to force a 5 token Tzul. So, important takeaways:
- Place your first token so that you deny the middle Hexes.
- Place your second token to grab at least one 3+ hex Tzul spots.
- Place your third token to either force a 4+ hex Tzul or to create multiple other spots.
One more important thing to consider is that placing tokens in a straight line allows for One with the Wind + Cyclonic Pull shenanigans.
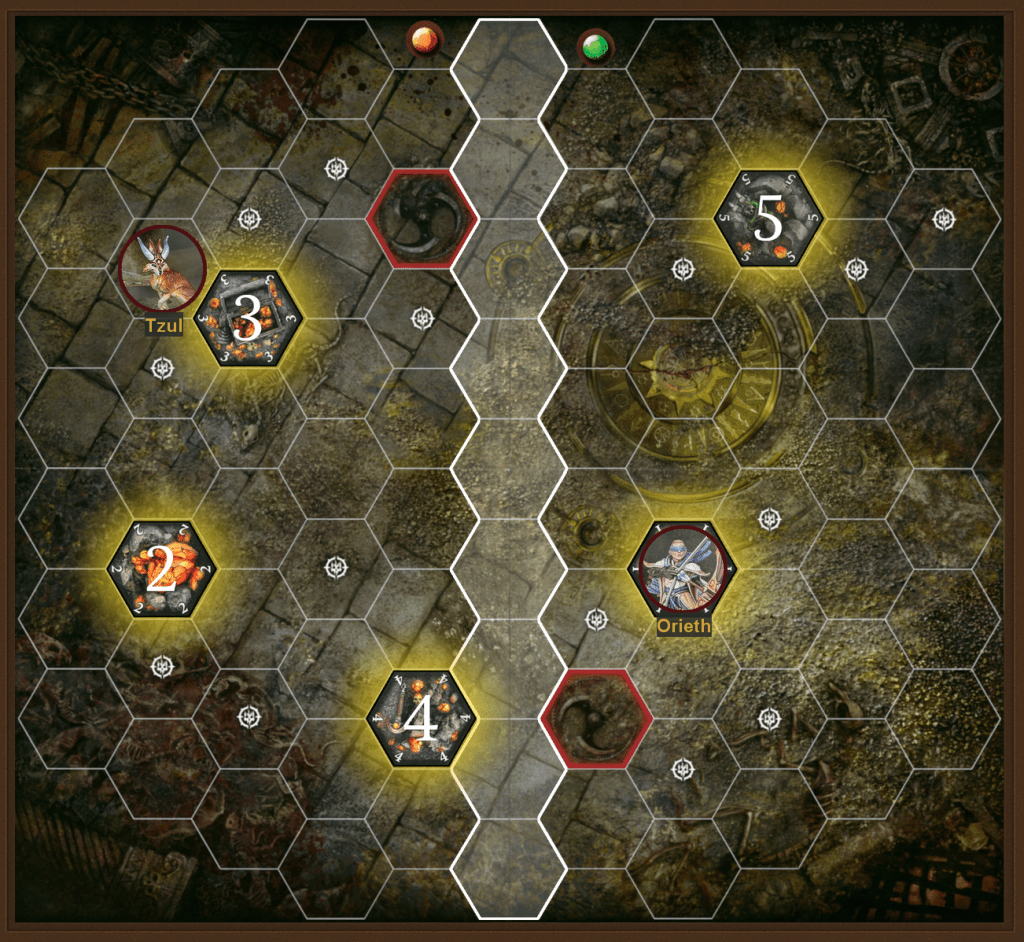
So try and place your tokens in straight lines from enemy tokens! (you’ll probably do this naturally to get good Tzul placement, but keep it in mind!)
Winning the Roll-off
If you win the roll-off, you get to decide the board! I’d suggest the Blocked hexes board for a more passive gameplan, or the Stagger Embergard board for more aggressive playstyles. Since you’re placing second, you can place a token in response to your opponent’s first token, then place the last to guarantee the 3+ token Tzul placement. You probably get denied a middle hex, so try and align with a hex right next to it.
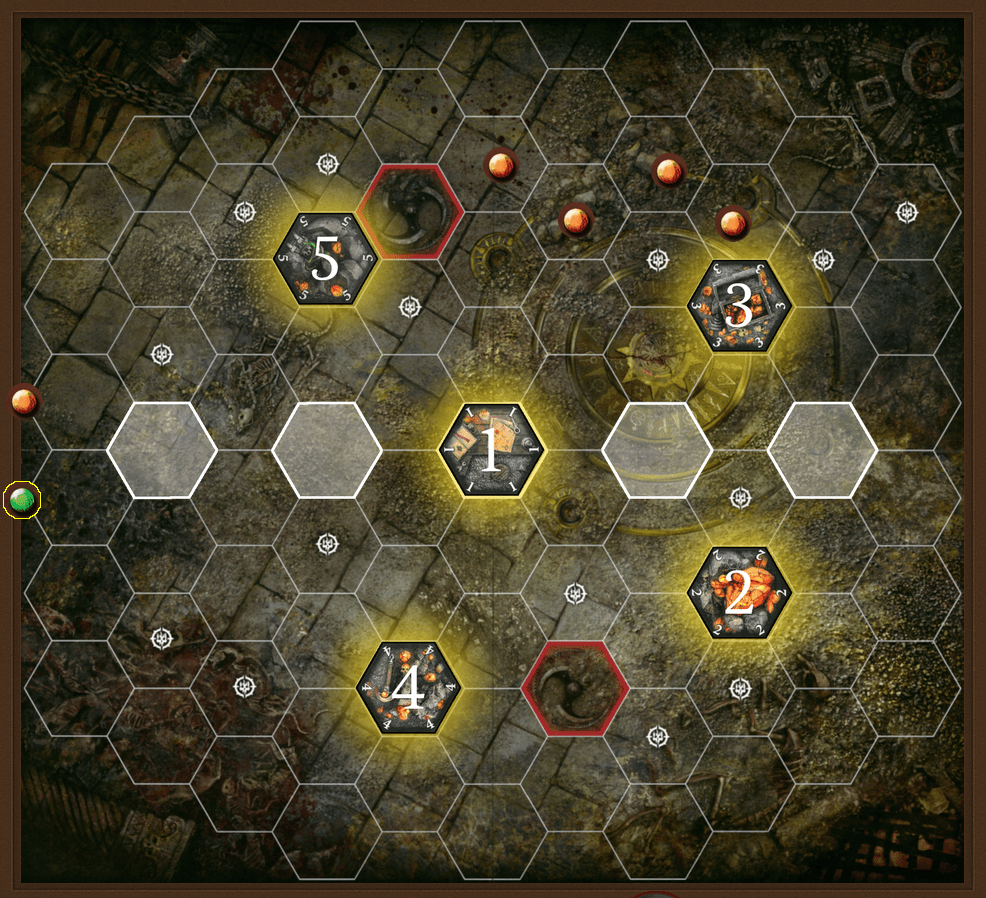
In this example, my opponent denies my Tzul placement, so I remember too place my token in a straight line. This makes it so my opponent is physically unable to place their Treasure token in their territory without giving me a 3+ hex Tzul or a straight line of tokens. (All of the orange tokens represent spots where a treasure token could be placed, where we would get a guaranteed 3+ hex Tzul (that we then turn into a 4+ hex Tzul))
Objective 4 is placed to create easy Tzul placements, and finally, 5 is one of the only spots where our opponent can deny a 4 hex Tzul.
So, what to take away:
- Place tokens in straight lines to force your opponents into bad positions
- Capitalize on their bad decisions by creating big Tzul spots
- Pick good boards!
Chapter 6: CtC/HG
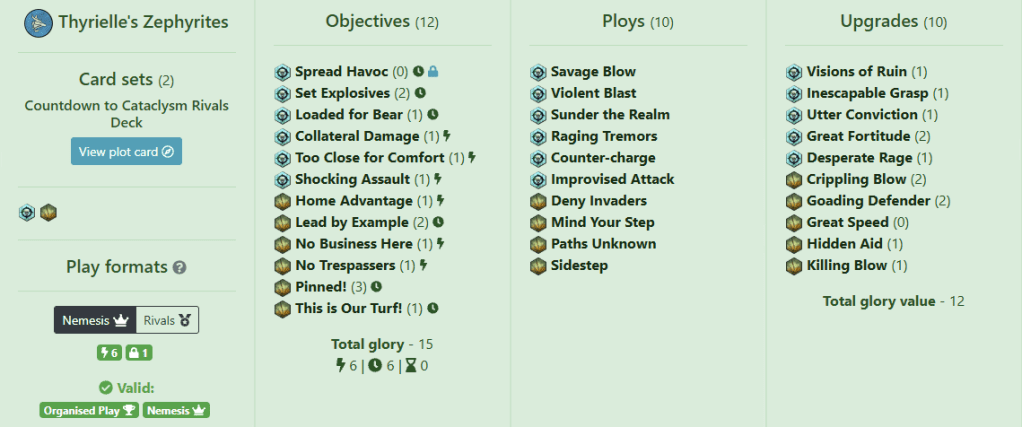
After being repeatedly reminded of the power of CtC/HG by someone, (won’t call any names…) I decided to try it for myself with my favourite Warband, and boy did they… uhm… kinda suck? This deck list is certainly not the strongest, however, it’s very fun. The goal is to keep your fighters safe whilst poking your opponents from a distance, all the while claiming some Treasures.
Objectives
The goal here is to be passive, but strike out when we have the opportunity. Our leader can attack from our territory with ease to score Lead by Example, whilst the insane Zephyrite movement makes Pinned! way easier. Since your fighters can basically teleport across the board, scoring Set Explosives should be a breeze, even in a flipped territory situation, whilst Spread Havoc is just straight up free glory! The weird thing with this deck is that you want to minimise interact, (because of your fragile fighters) but at the same time, you need it to score your stuff! Surges like Too Close for Comfort and No Business Here (and all other HG surges) require your opponent to come to you. This is good, because you have betrer passive scoring than most decks! You’ll score a grand total of 8 glory, (which is enough to outscore basically every deck…?!?!) so non ES/PP enemies have to come to you. You can use Tzul on the middle line to make sure enemies think twice about standing there, and force them one hex further your territory in, and use your Grapple to pull them into your slaughter machine (1 damage is enough guys trust).
Don’t be afraid to mulligan surges like Collateral damage and Too Close for Comfort in the first round, you’ll score them eventually, but you have some of the best defensive stats in round one, so you probably won’t die.
Substitutions: you can take Wreckers, I guess. Swapping Too Close for Comfort for Back Off is a lot more viable of a switch and can really define the playstyle of this deck. The issue with Back Off is that your deck then just loses to “Guard, the action”.
Ploys
The Ploys mainly serve as accuracy tools to help you hit those key attacks (to score Pinned and Surges). Some distraction effects like Violent Blast and Misstep allow you to position enemies in the perfect way, whilst Counter-Charge is just a really good card, especially to get a fighter windblown! Finally, Sunder the Realm gives us some nice ping damage and Paths Unknown allows us to keep a fighter alive for a key activation.
Improvised Attack gives us another way to inspire a fighter, as well as scoring us a lot of our surges, being a driveback tool to get Pinned, AND dealing damage. Insane card.
Substitutions: There’s nothing too interesting here, so you can spice it up with the more interesting Ploys. Poor Footing or Total Collapse can be swapped in for any of the ploys (it’ll be a hard choice though).
Upgrades
The upgrades are actually really fun in this deck. Crippling Blow allow us to keep a fighter stuck in our territory, whilst also being a Melee attack (so it can get Grievous). Desperate rage gives us some much needed burst damage, whilst Killing Blow gives us the aforementioned Grievous.
Visions of Ruin and Great Speed are just so good with flying fighters, allowing you to literally reach any hex, and your opponent can’t do anything about it! Goading Defender and Hidden Aid the allow us to stay alive in the spots we reach, whilst Great Fortitude gives some Health to survive elite aggro.
Substitutions: Sadly, there aren’t any good upgrades to swap in. The most fun I can think of is to take True Grit and bunker up with your leader, being on Guard with your entire team, however, that denies you every advantage Zephyrites have.
Chapter 7: BA/PP
Blazing Pillage good 👍
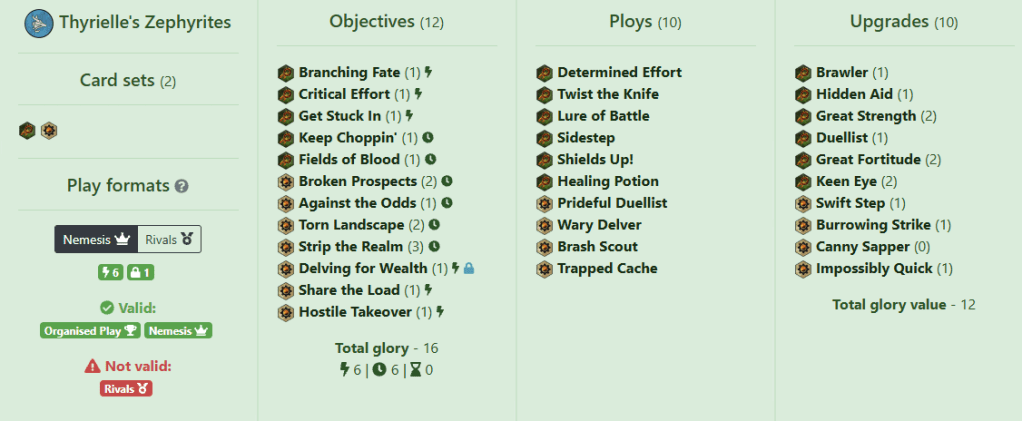
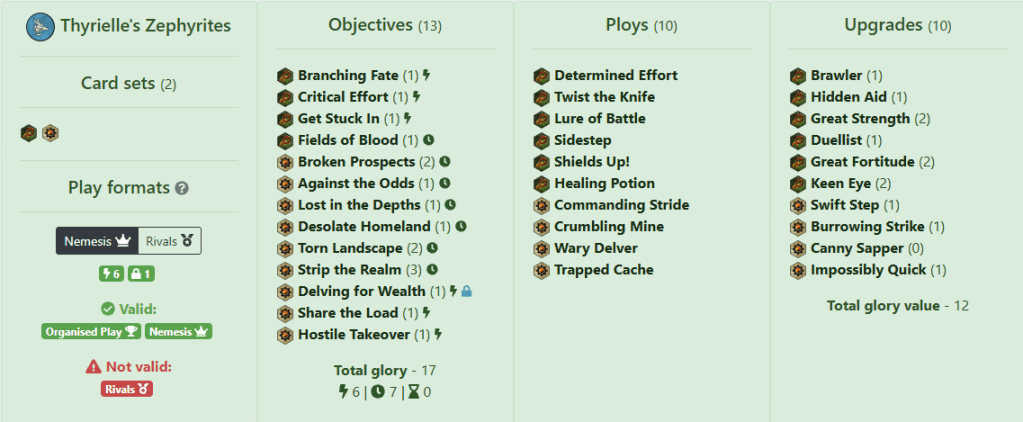
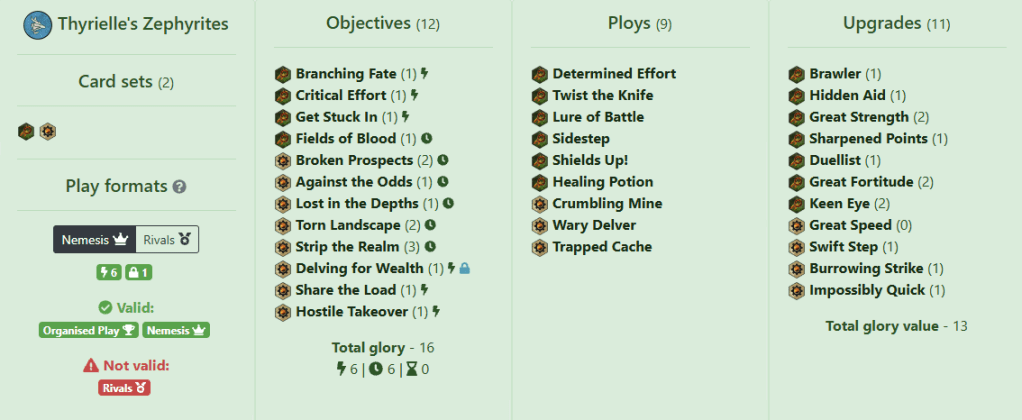
Or even this one!
You know why all of these cards are good, so I’ll just give a quick rundown of how to build it! Surges and endphases are easy, you just take these ones:
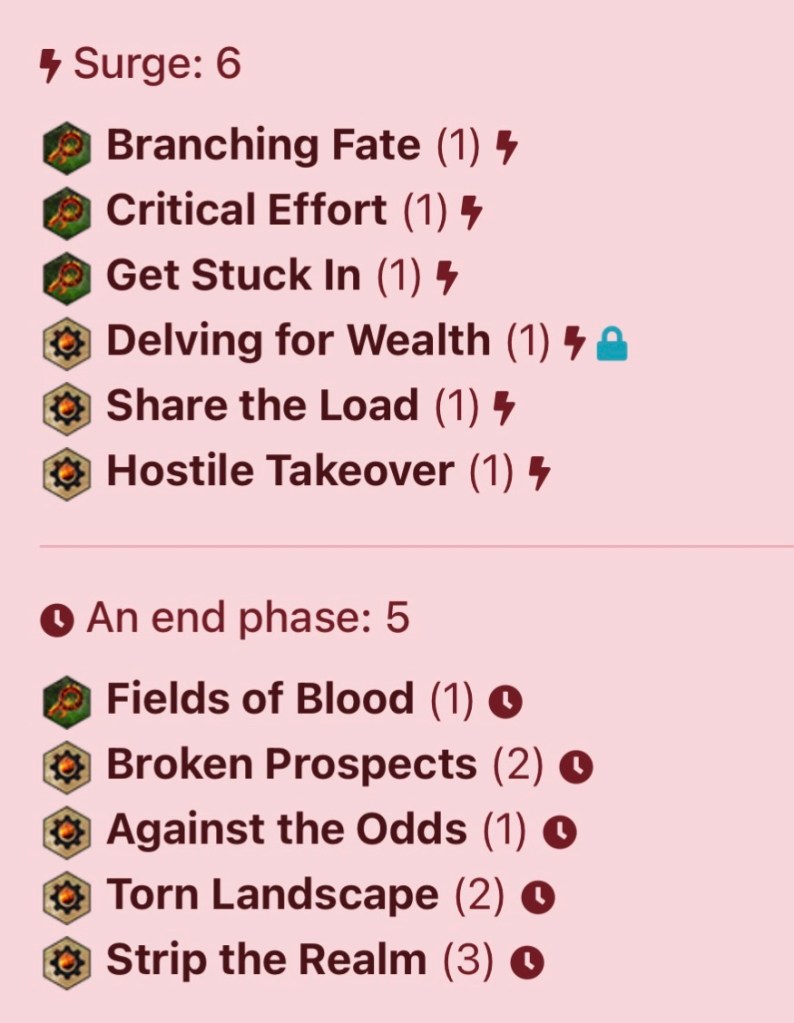
And add 1/2 of the following:
- Lost in the Depths
- Keep Chopping
- Desolate Homeland
To build, take:
- Sidestep
- Shields Up!
- Wary Delver
- Determined Effort
- Twist the Knife
- Lure of Battle
- Trapped Cache
Then choose 3 or 4 of the following:
- Commanding Stride (If you plan on playing passive with your leader)
- Healing Potion (If you think you’ll face a lot of horde/CtC)
- Crumbling Mine (If you’re running Torn Landscape and Desolate Homeland)
- Prideful Duellist (If you like playing aggressively)
- Explosive Charges (If you like playing aggressively)
- Wings of War (You’ll never guess what I’m going to put here… take Wings of War if… you like playing aggressively)
For upgrades, pick 10/11 that you like:
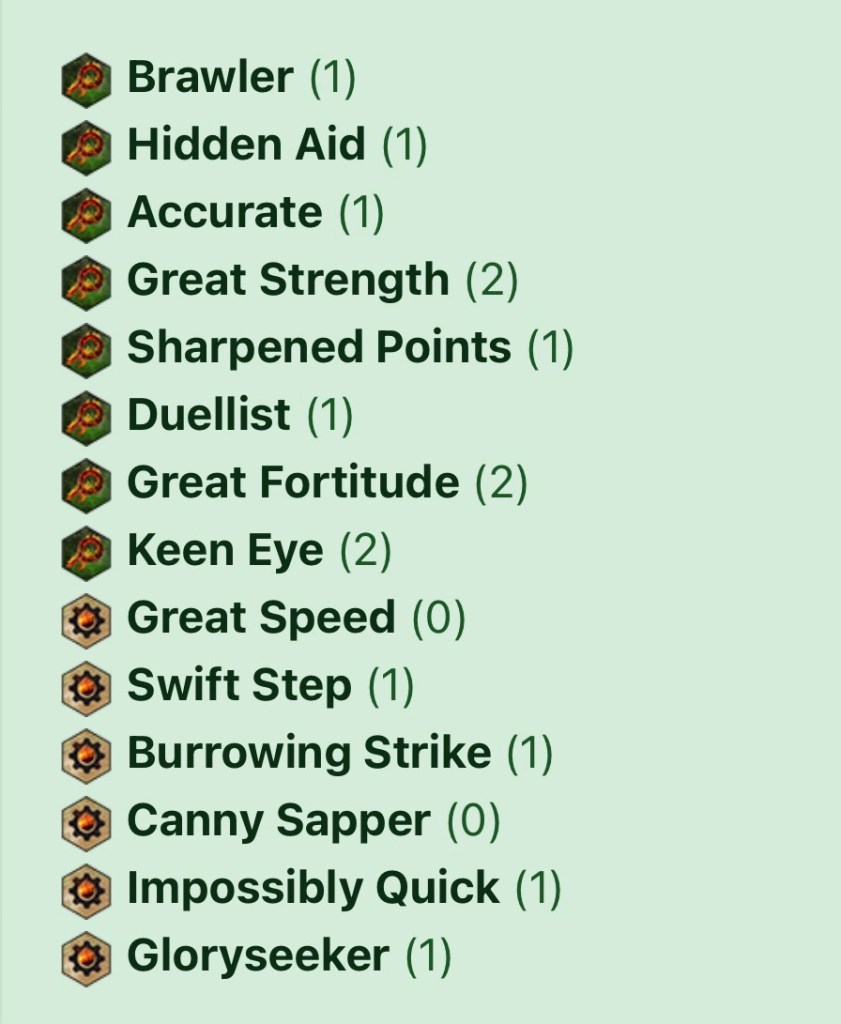
Tips
I don’t need to tell you how to play Blazing Pillage right? It’s two words:
Charge onto tokens
Ok that may be three words but you get my point.
Conclusion
You’ve come to the end of my Zephyrite series! Or at least, for now. Who knows, maybe I’ll return someday! I will however, definitely continue playing them! They’re so much fun and can be played in so many ways, so I definitely reccomend them. They are on the difficult side but incredibly rewarding when you learn them. Again, if you missed Part 1 of this series, you can find it here. If you have any questions regarding them, come find me on the Staggerers Discord With that, may the winds guide you to a very good day!
 Staggerers - A Warhammer Underworlds Blog